
Developer Documentation
Welcome to the Clickterm developer documentation!
Clickterm provides you with all the tools to manage clickwraps for your apps and projects. A clickwrap can be your app's Terms and Conditions:
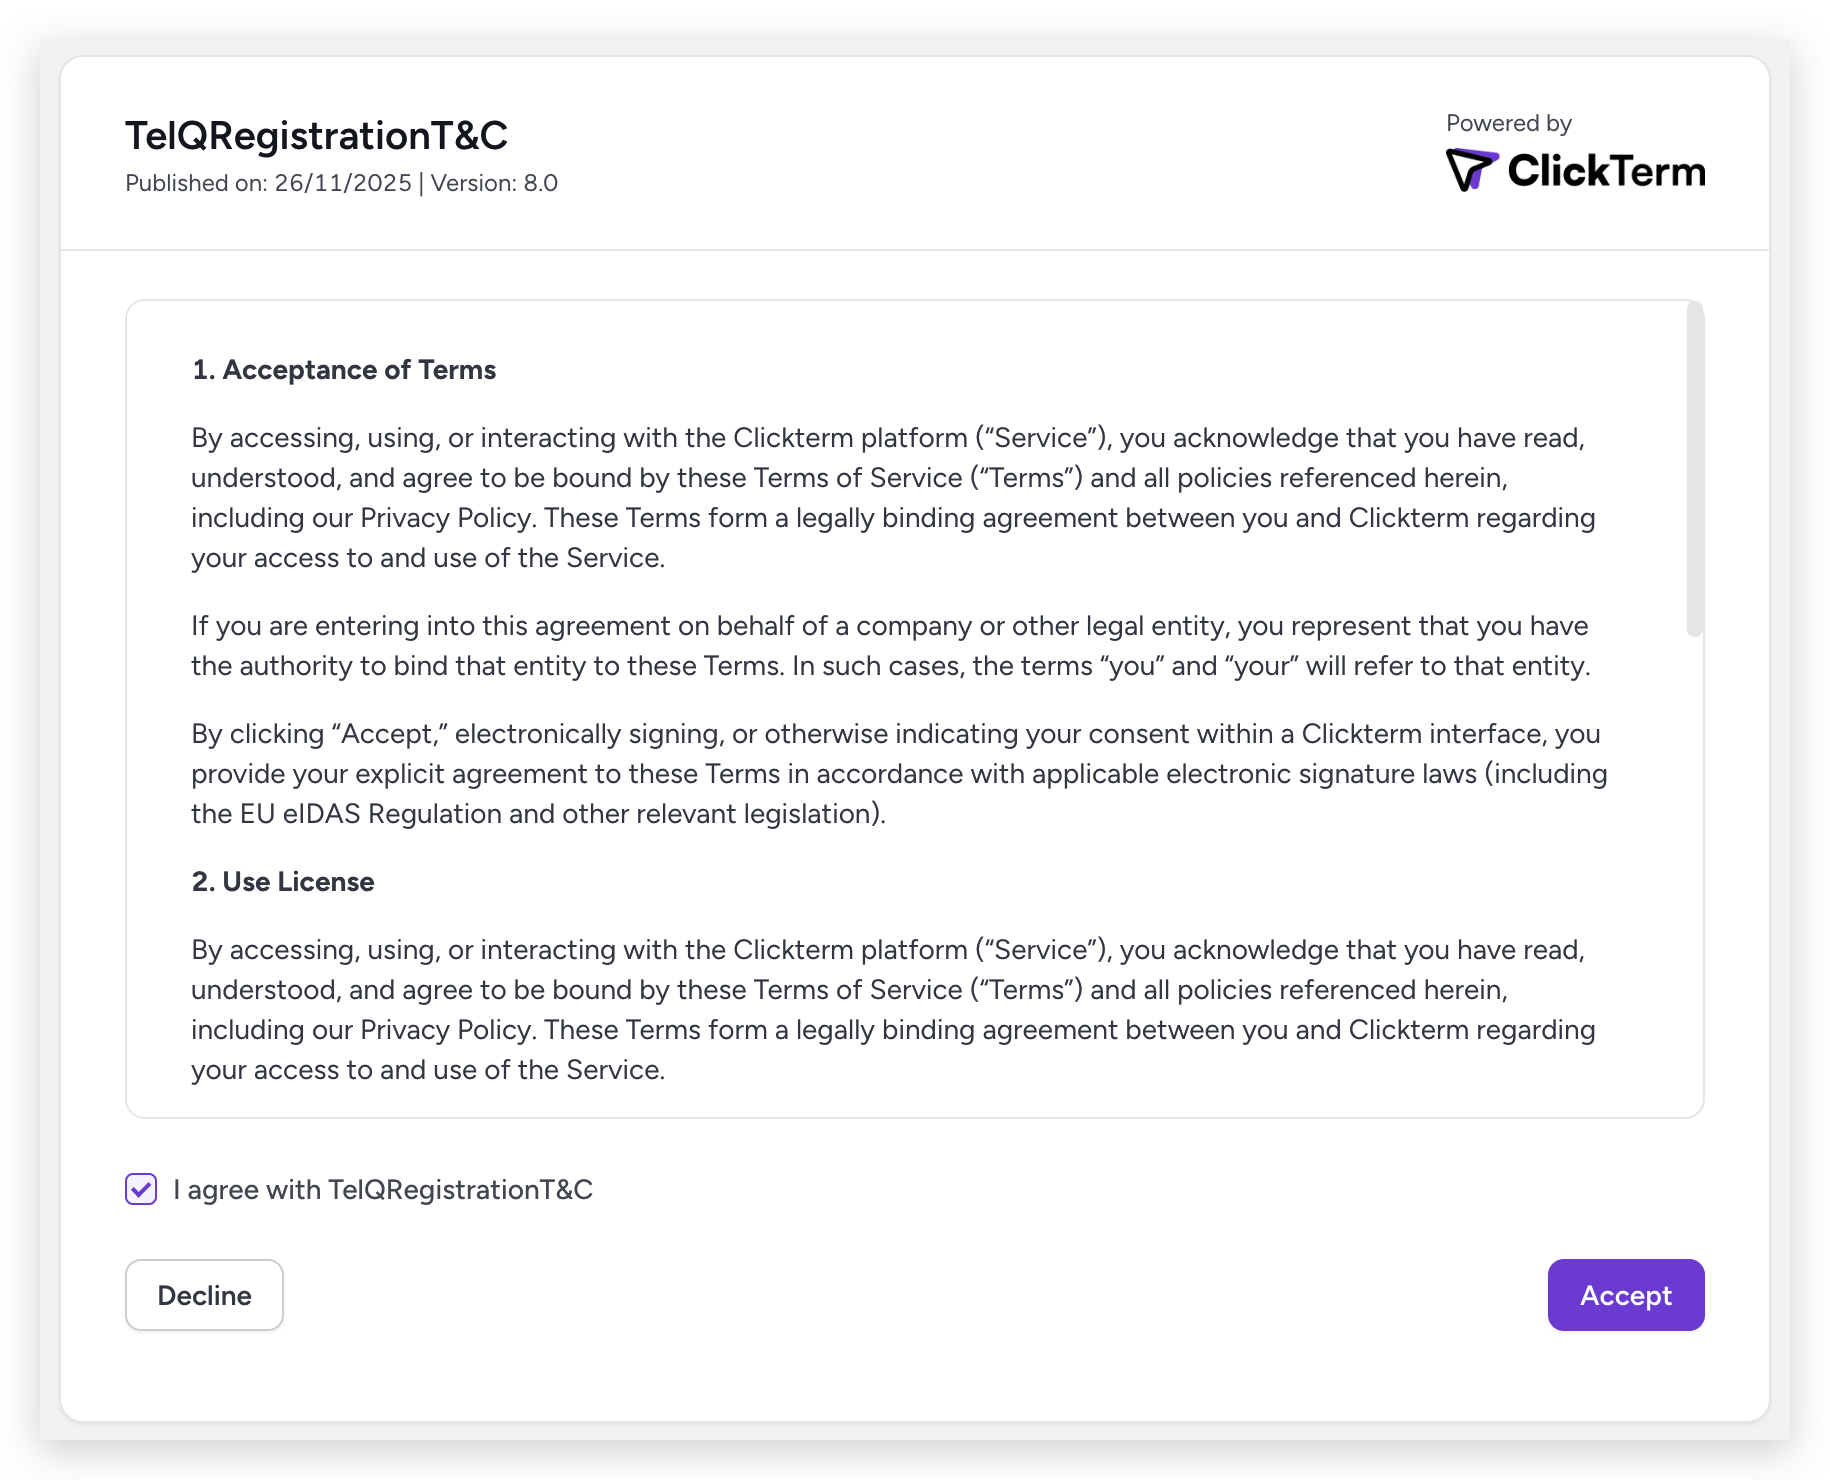
You can use our Client SDKs to display Clickwraps to your end-users and use Clickterm's frontend at app.clickterm.com to manage templates, versions, adoption and much more.
Quick Start
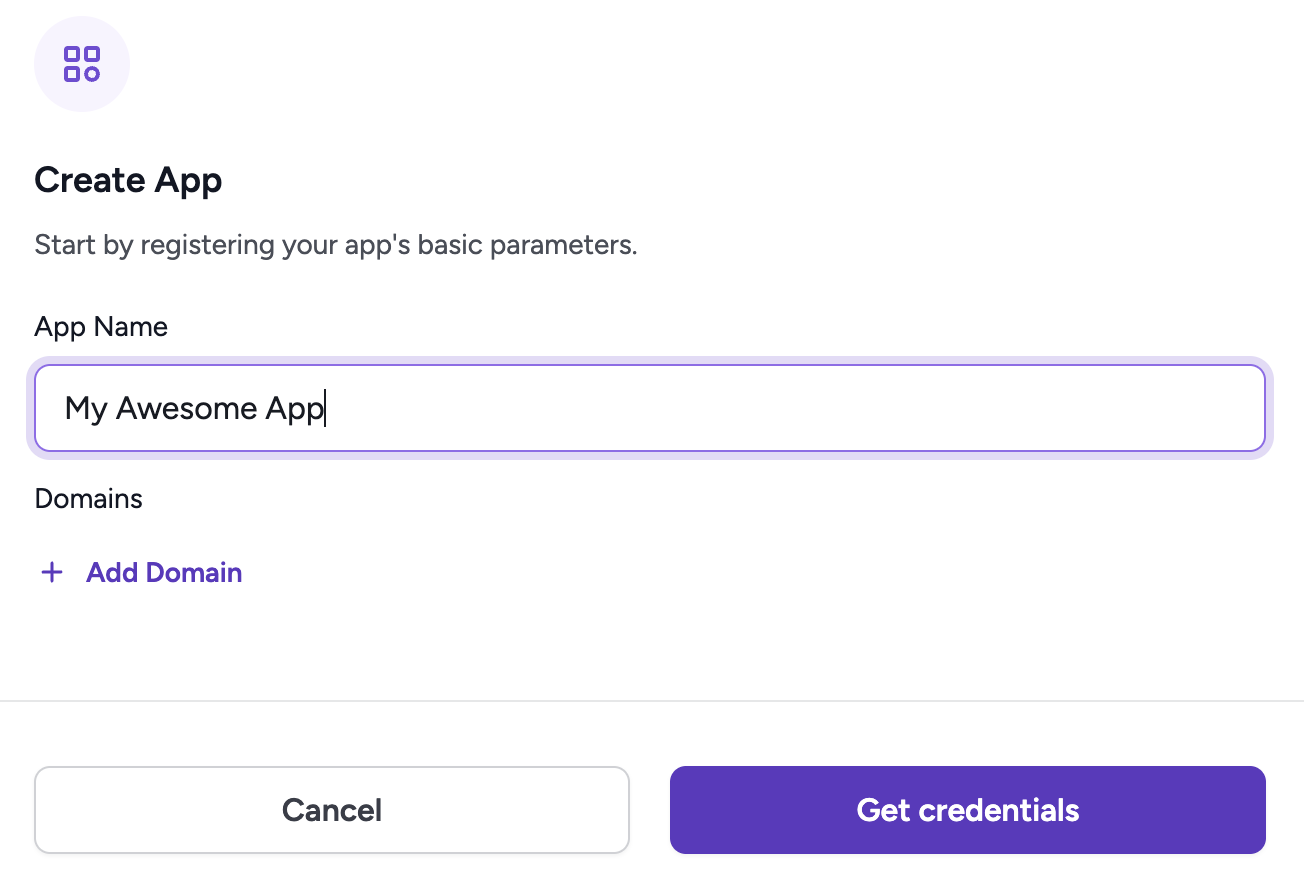
1. Creating an App
Once you have your Clickterm account (sign-up) you can head to the Integrations menu and add a new Integration.
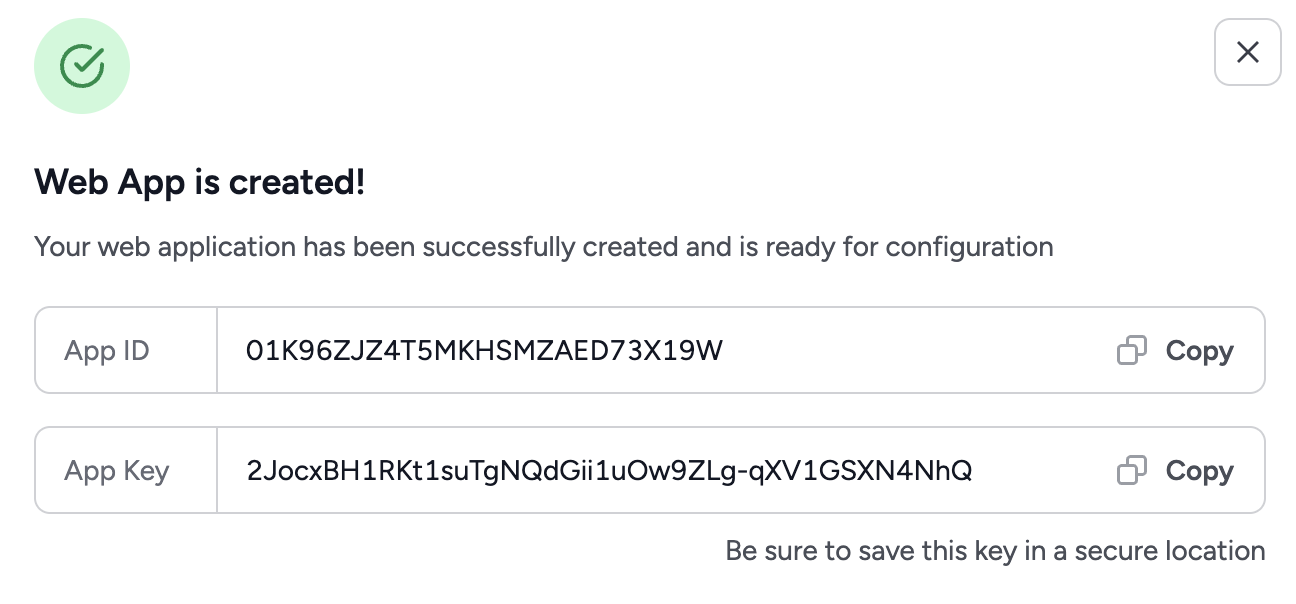
Once the App has been created, you will be presented with your App ID and App Key. You will need these 2 at different points of the integration process to validate and authenticate your interactions with the Clickterm SDKs and REST API.
2. Creating a Template
The next step is to create a Clickwrap Template in the Templates menu. Choose a name and select Create.
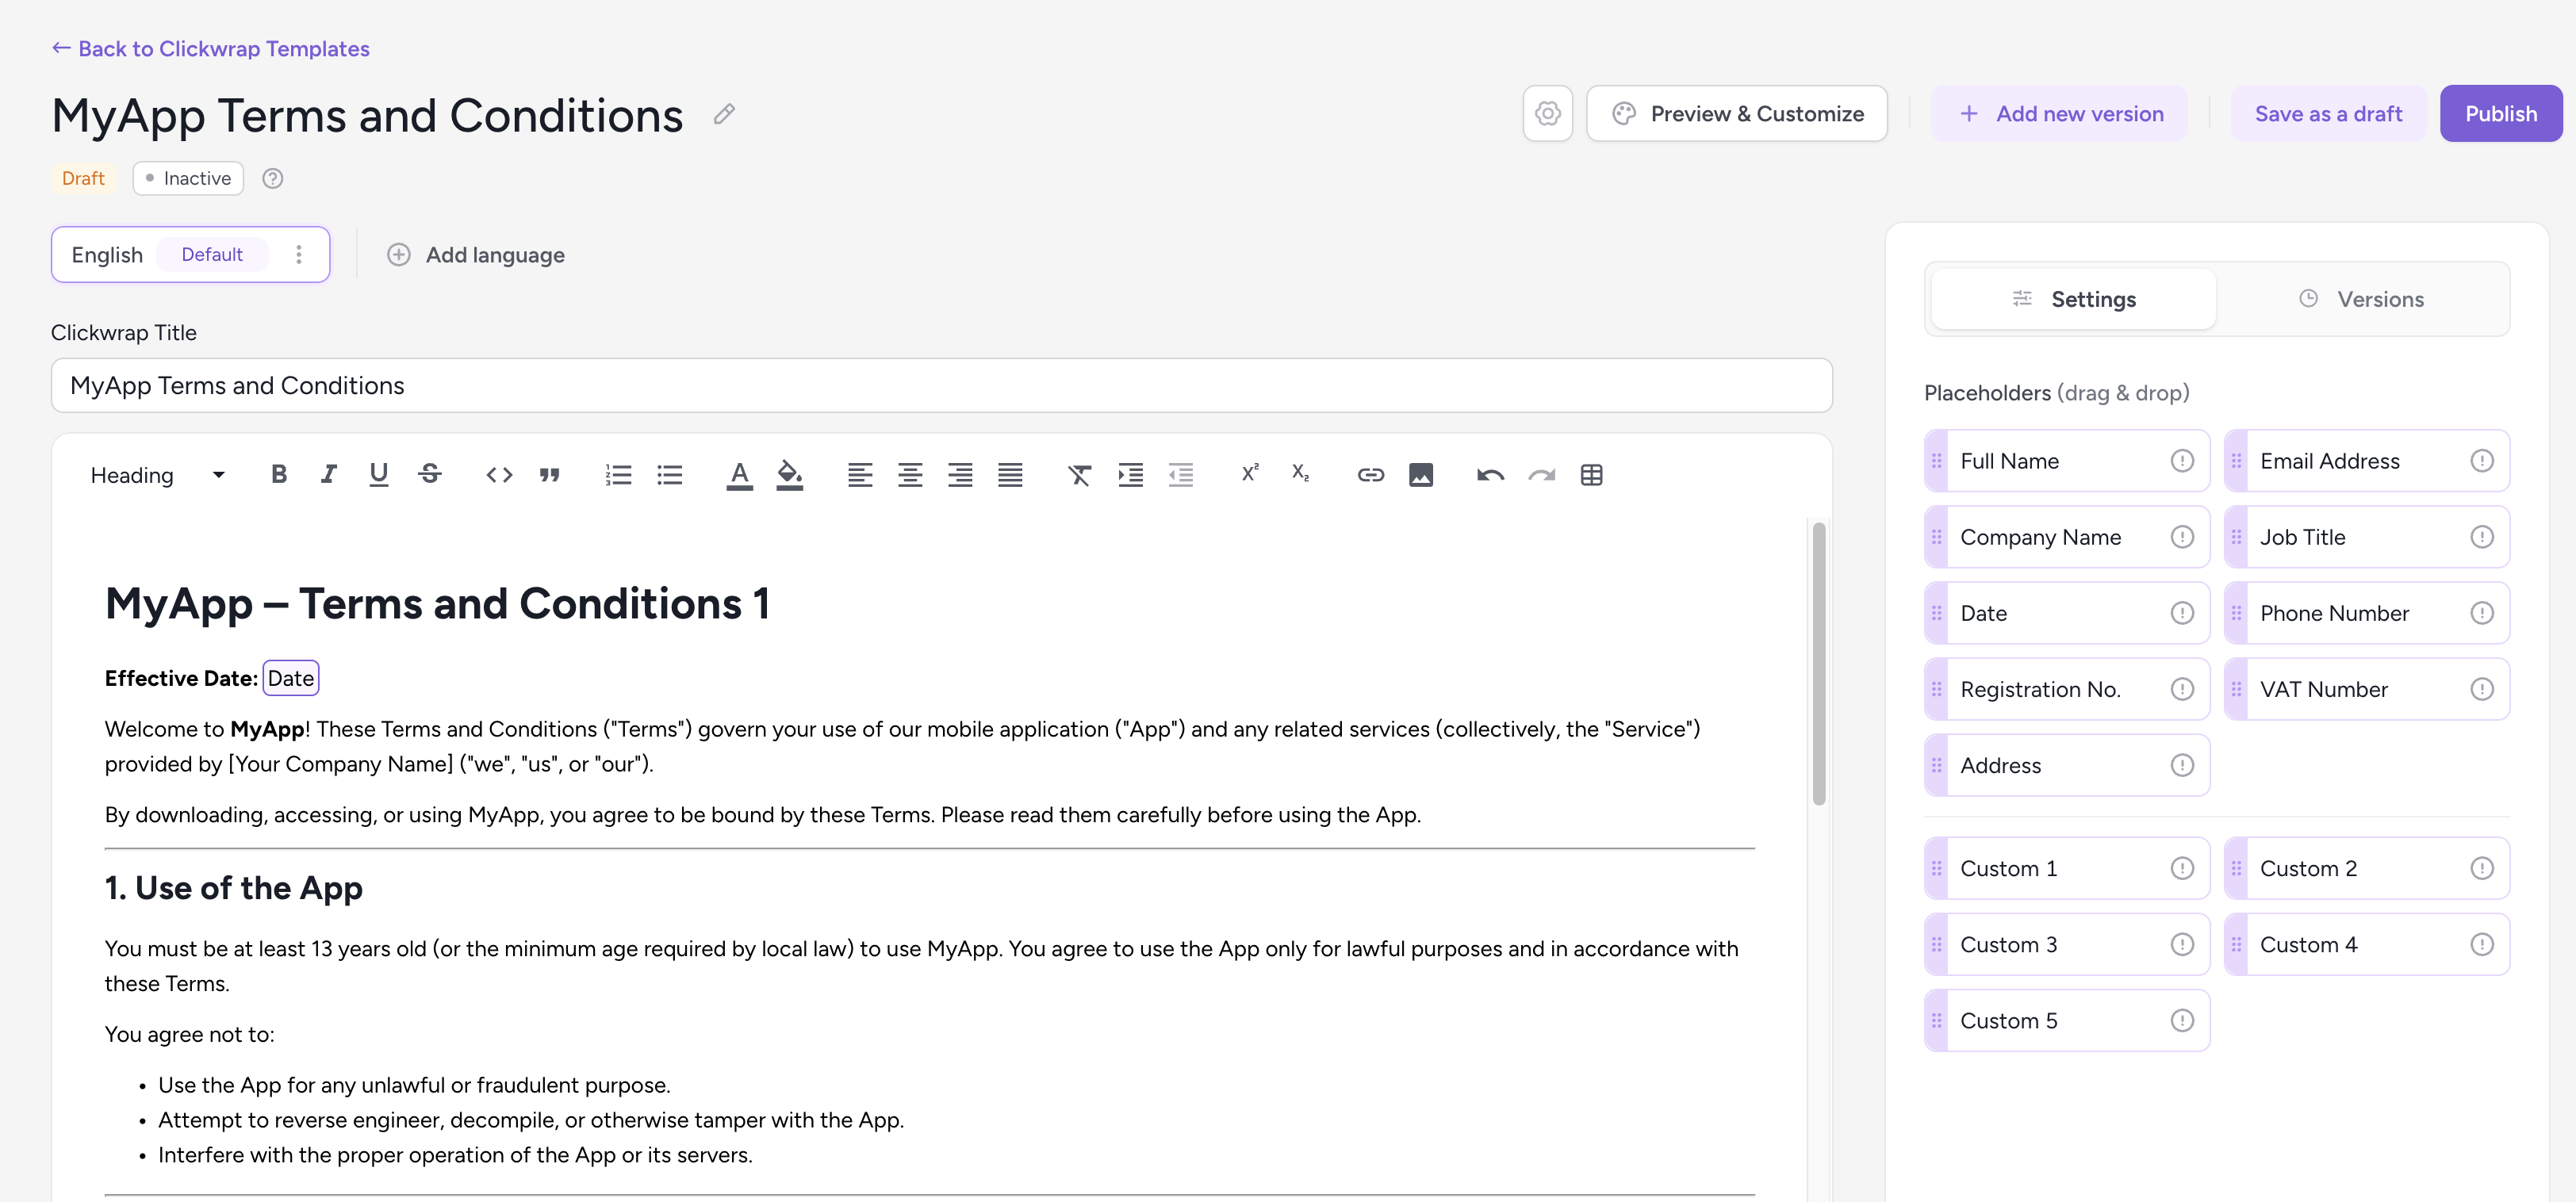
Here you can add your text and take advantage of our Clickwrap Placeholders. These dynamic pieces of data can be provided to our Client SDKs and will be inserted into your Template Content to further personalize your clickwrap.
3. Publishing your Template's Content
You can save your content as a Draft at any time, and when you are ready, Publish it, which will lock the Content and save it as a new version. You can publish additional versions in the future if you want to make changes to your content.

During publication, you can specify:
Acceptance deadline (
mustAcceptBy) – The date and time by which end users are expected to accept the clickwrap. This field is optional and serves primarily as informational guidance; it does not automatically block access or enforce acceptance.Effective at (
effectiveAt) – The date and time when the published version becomes effective and is presented to end users. Before this time, the previous version (if any) remains in effect. Note that the active version is determined by this timestamp, not by publish order — a newly published version does not become current until its Effective at time is reached.
4. Enabling your Template
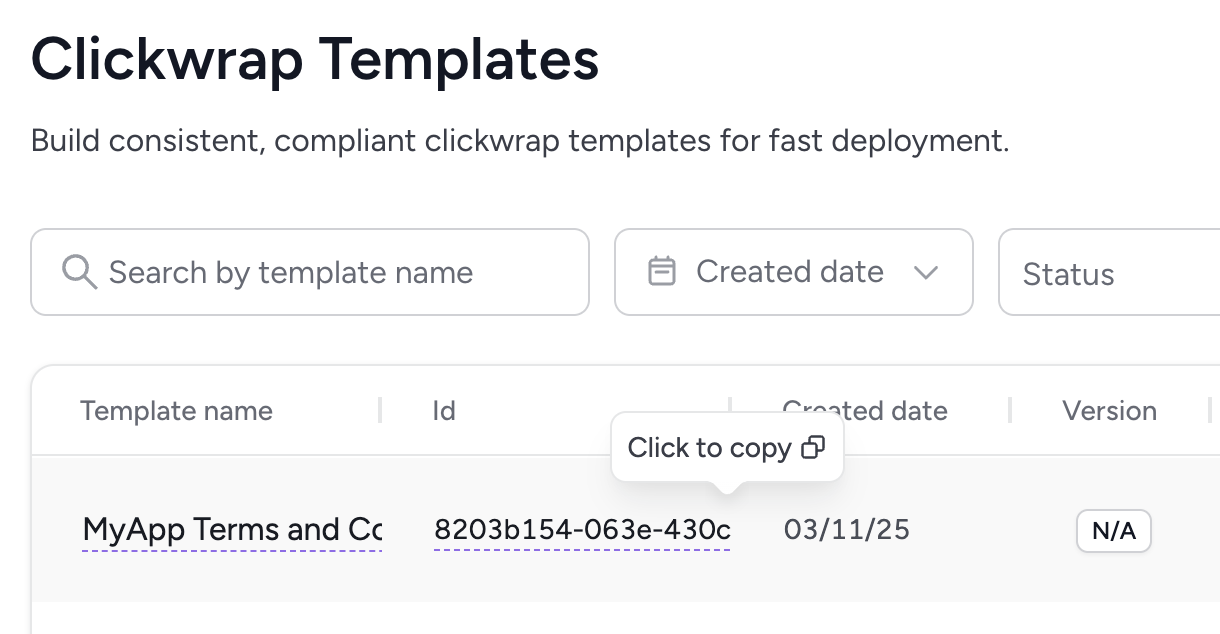
After you publish the Template content, you must Enable the Template from the Templates table to make it available for client clickwrap requests. You can Disable the Template at any time to stop new requests from using it.

Once your Template has been created, you will need to retrieve the Clickwrap Template Id, which you will need in the following steps.
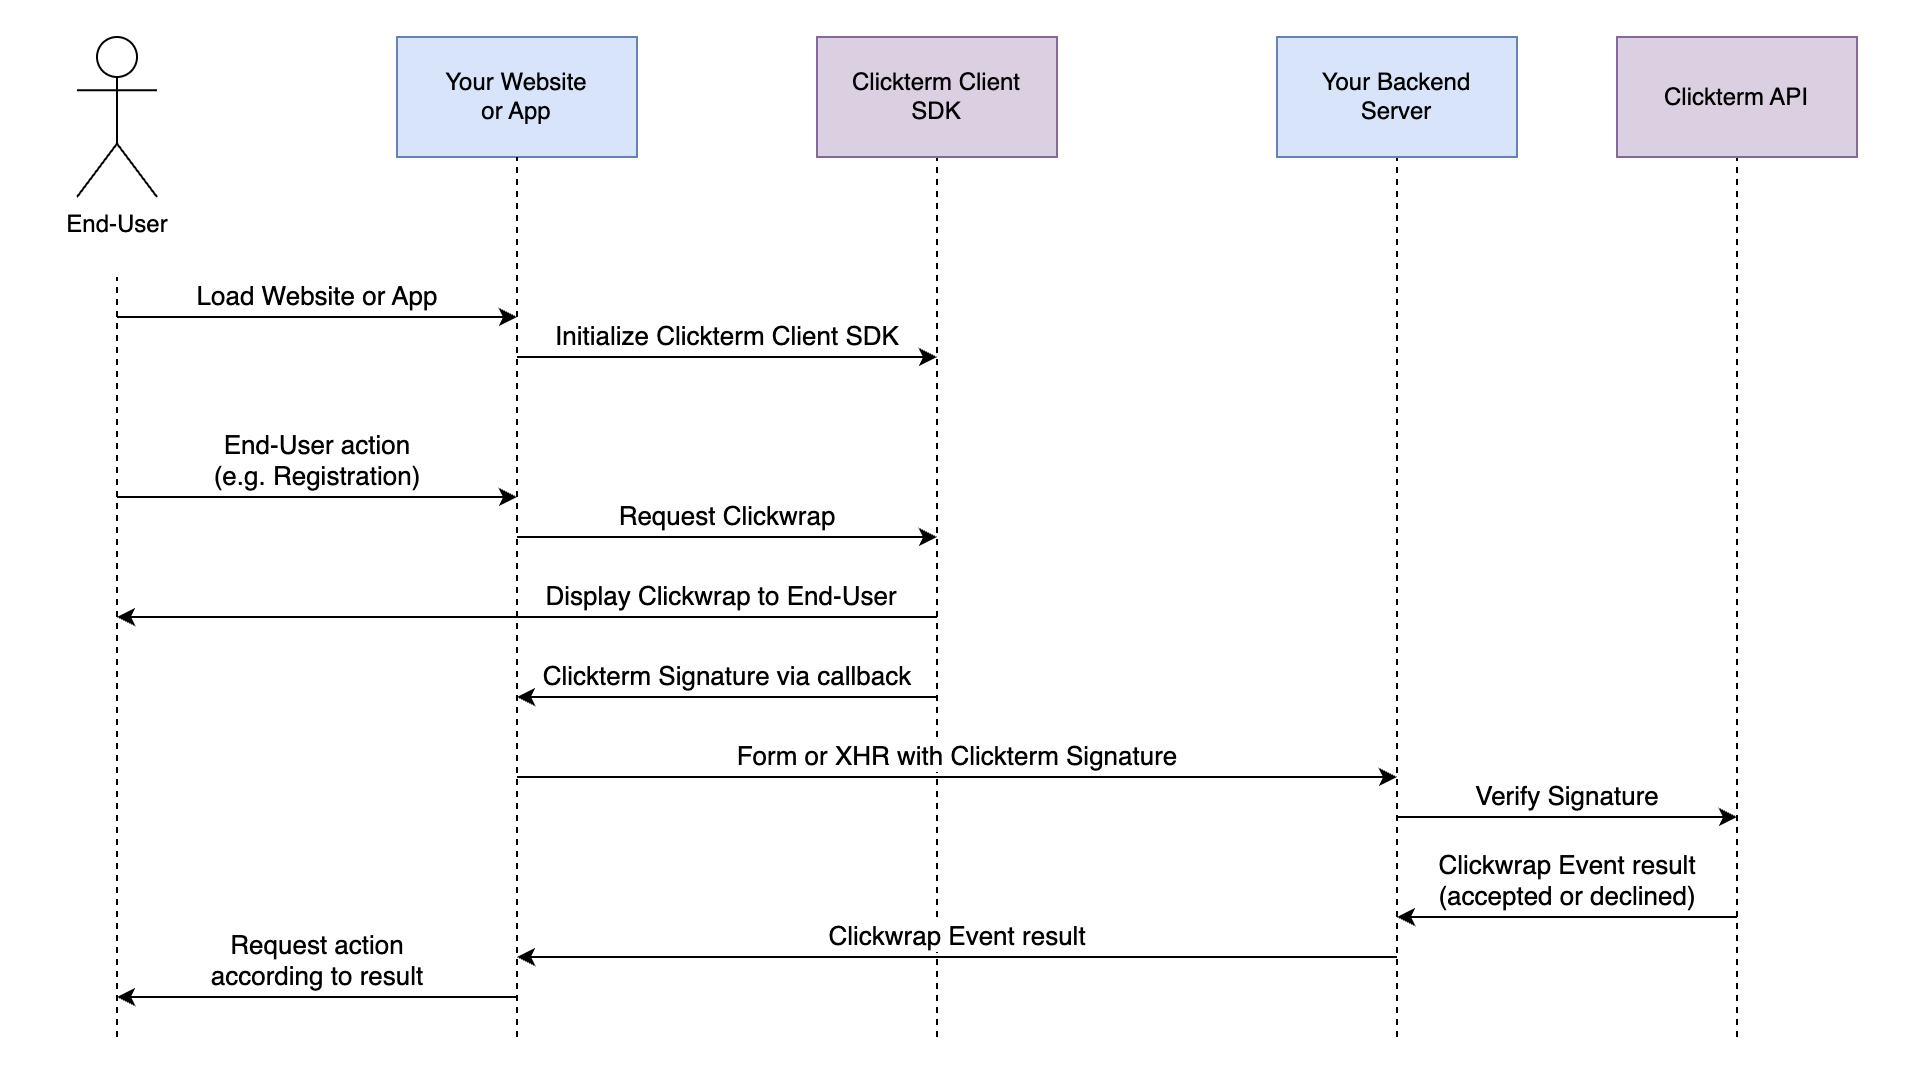
Integration Flow
The following flow is similar to that used by different Captcha providers:
- You include the ClickTerm SDK on your web frontend or mobile app. For example, on your registration form.
- You show a Clickwrap dialog to your end-user using our SDK. If the end-user has not accepted the latest effective major version of your Clickwrap Template, a modal will be displayed for them to accept or decline.
- Once the end-user accepts or declines, the SDK creates an unverified event in the ClickTerm app and returns a Signature to your application.
- After that, you need to send the Signature to your backend along with the form data.
- Your backend server sends the Signature to our API (
POST /clickwrap/verify) for verification, authenticating with your App ID and App Key values. The response will contain the action taken by the end-user (ACCEPTEDorDECLINED) and other useful metadata. A Clickwrap Event will be verified in our system and a Certificate of Acceptance will be generated. - You can notify your frontend or mobile app in the response from your backend with the action taken by the end-user on the Clickwrap (accepted or declined).
// Add this script tag to the end of body in your index.html.
<script src="https://cdn.clickterm.com/sdk/clickterm-widget-2.1.0.min.js"></script>

// Destructure the SDK from the global window object and initialize with your App ID.
<script>
    const { ClicktermClient, ClicktermDialog } = window.Clickterm;
    ClicktermClient.initialize("YOUR_CLICKTERM_APP_ID");
</script>
// Inside build.gradle (app level)
dependencies {
    // ... other dependencies
    implementation 'com.clickterm:android-sdk:2.1.0'
}
// In your Application class or MainActivity initialize the SDK with your AppId
ClicktermClient.initialize("YOUR_CLICKTERM_APP_ID");
Core Clickwrap Flow
These sections cover the three steps every ClickTerm integration must complete, in order: initializing the SDK, presenting the clickwrap, and verifying the captured signature. Complete these steps before using any optional APIs.
Initialize ClicktermClient
Initialization examples:
To initialize our Client SDK, you only need to provide your Clickterm App ID. You can obtain it from our Integration menu on the Clickterm web app (app.clickterm.com/integrations).
The App Key is intentionally not used here. Because the Client SDK runs in your users' browsers or mobile apps, any value passed to it is visible to end users. The App Key is a secret credential used only for server-to-server calls (e.g. the /clickwrap/verify endpoint) and must never appear in client-side code.
// Add this script tag to the end of body in your index.html.
<script src="https://cdn.clickterm.com/sdk/clickterm-widget-2.1.0.min.js"></script>

// To use the client SDK you can destructure from the global window object.
<script>
    const { ClicktermClient, ClicktermDialog } = window.Clickterm;
    ClicktermClient.initialize("YOUR_CLICKTERM_APP_ID");
</script>
// Inside build.gradle (app level)
dependencies {
    // ... other dependencies
    implementation 'com.clickterm:android-sdk:2.1.0'
}

// In your Application class or MainActivity initialize the SDK with your App ID
ClicktermClient.initialize("YOUR_CLICKTERM_APP_ID");
For WEB SDK
You will just need to include a script tag in your HTML to load the SDK. After that you can initialize it with your App ID.
For Android SDK
You will need to add the dependency to your app level build.gradle file in the dependencies section.
Requesting a Clickwrap
This is how you can show a Clickwrap to your end user.
ClicktermDialog.show({
    endUserId: options.endUser,
    clickwrapTemplateId: options.templateId,
    language: "en" // Optional. If omitted, the default language configured in ClickTerm UI will be used
}).then((result) => {
    console.log('Clickwrap result:', result);
    // This signature should be sent to your backend ...
}).catch((error) => {
    console.error('Clickwrap error:', error);
});

// You can also call the dialog with configuration options:
ClicktermDialog.show({
    endUserId: options.endUser,
    clickwrapTemplateId: options.templateId,
    language: "en" // Optional. If omitted, the default language configured in ClickTerm UI will be used,
    templatePlaceholders: { fullName: name }
}, {
    disableClose: true, // Force the user to explicitly accept or decline — disables closing by clicking outside the dialog
}).then((result) => {
    console.log('Clickwrap result:', result);
    // This signature should be sent to your backend ...
}).catch((error) => {
    console.error('Clickwrap error:', error);
});
ClickwrapTemplate contentRequestBody = new ClickwrapTemplate("YOUR_CLICKTERM_TEMPLATE_ID", endUserID, new HashMap<>(), "LANGUAGE_CODE");
ClicktermDialog.show(this, contentRequestBody, null, new ClicktermDialog.OnAgreementResultListener() {
    @Override
    public void onSuccess(String clicktermSignature) {
        if (clicktermSignature == null) {
            Log.i("Clickterm result: ", "No signature received, user has already acted on the agreement.");
        } else {
            Log.i("Clickterm result: ", clicktermSignature);
            // This signature should be sent to your backend ...
        }
    }

    @Override
    public void onError(String message) {
        Log.e("Clickterm", message);
    }
});
Example result when the user accepts or declines the Clickwrap:
{
  "clicktermSignature": "eyJhbGciOiJSUzI1NiJ9...",
  "isAlreadyAccepted": false,
  "isCanceled": false
}
Example result when the user has already accepted the latest major version:
{
  "clicktermSignature": null,
  "isAlreadyAccepted": true,
  "isCanceled": false
}
Example result when the user closes the dialog without accepting:
{
  "clicktermSignature": null,
  "isAlreadyAccepted": false,
  "isCanceled": true
}
To request a new Clickwrap, you need to provide the following parameters:
| Parameter | Required | Description |
|---|---|---|
| clickwrapTemplateId | Yes | The ID of your Clickwrap template. You can obtain this from the Clickterm web app after creating a template. |
| endUserId | Yes | String 256 max length. The identifier we will use in Clickterm to identify your endUser's events. If your userId is not known yet you can generate a UUID and map it to your userId in your backend |
| templatePlaceholders | No | Values that are to be replaced in the placeholders you set in your Clickwrap Template. When using the SDK, values are encoded automatically. If you are calling the REST API directly (without an SDK), values must be URL-encoded. |
| language | No | Specifies the language used for both the Clickwrap dialog UI and the template content. Supported languages and the default language for the content are configured in the ClickTerm UI before publishing the version. If omitted or if an unsupported language is used, the content in the default language will be returned. Use one of the supported language codes listed below, and make sure your template version includes content in that language. |
Configuration options
The second argument to ClicktermDialog.show() accepts the following optional configuration:
| Parameter | Default | Description |
|---|---|---|
disableClose |
false |
Controls whether the end user can dismiss the dialog by clicking the grayed-out area outside of it. When set to false (default), clicking outside the dialog closes it and the result will have isCanceled: true. When set to true, clicking outside does nothing — the user must explicitly accept or decline the agreement to proceed. |
Result format
The result object returned by ClicktermDialog.show() contains the following fields:
| Field | Type | Description |
|---|---|---|
clicktermSignature |
String | The cryptographic signature proving the end user's action. null if the user has already accepted or canceled the dialog. When present, this signature should be sent to your backend for verification. |
isAlreadyAccepted |
Boolean | true if the end user has already accepted the latest major version of this template. The dialog is not shown and no new signature is generated. |
isCanceled |
Boolean | true if the end user closed the dialog without accepting. Only possible when disableClose is not enabled. |
Languages
The language parameter determines which localized template content as well as which UI strings (buttons, prompts, labels) appear in the dialog. ClickTerm does not auto-translate your content, so create localized template content for every language in the ClickTerm UI you plan to support.
You can use the following values:
| Code | Language |
|---|---|
en |
English |
de |
German |
fr |
French |
es |
Spanish |
zh |
Chinese (Simplified) |
hi |
Hindi |
ru |
Russian |
bg |
Bulgarian |
cs |
Czech |
nl |
Dutch |
el |
Greek |
fi |
Finnish |
hu |
Hungarian |
it |
Italian |
no |
Norwegian |
pl |
Polish |
pt |
Portuguese |
ro |
Romanian |
sr |
Serbian |
sv |
Swedish |
uk |
Ukrainian |
If you omit the language parameter, or if you request a language that your template version does not contain, ClickTerm falls back to the default language configured for the published version.
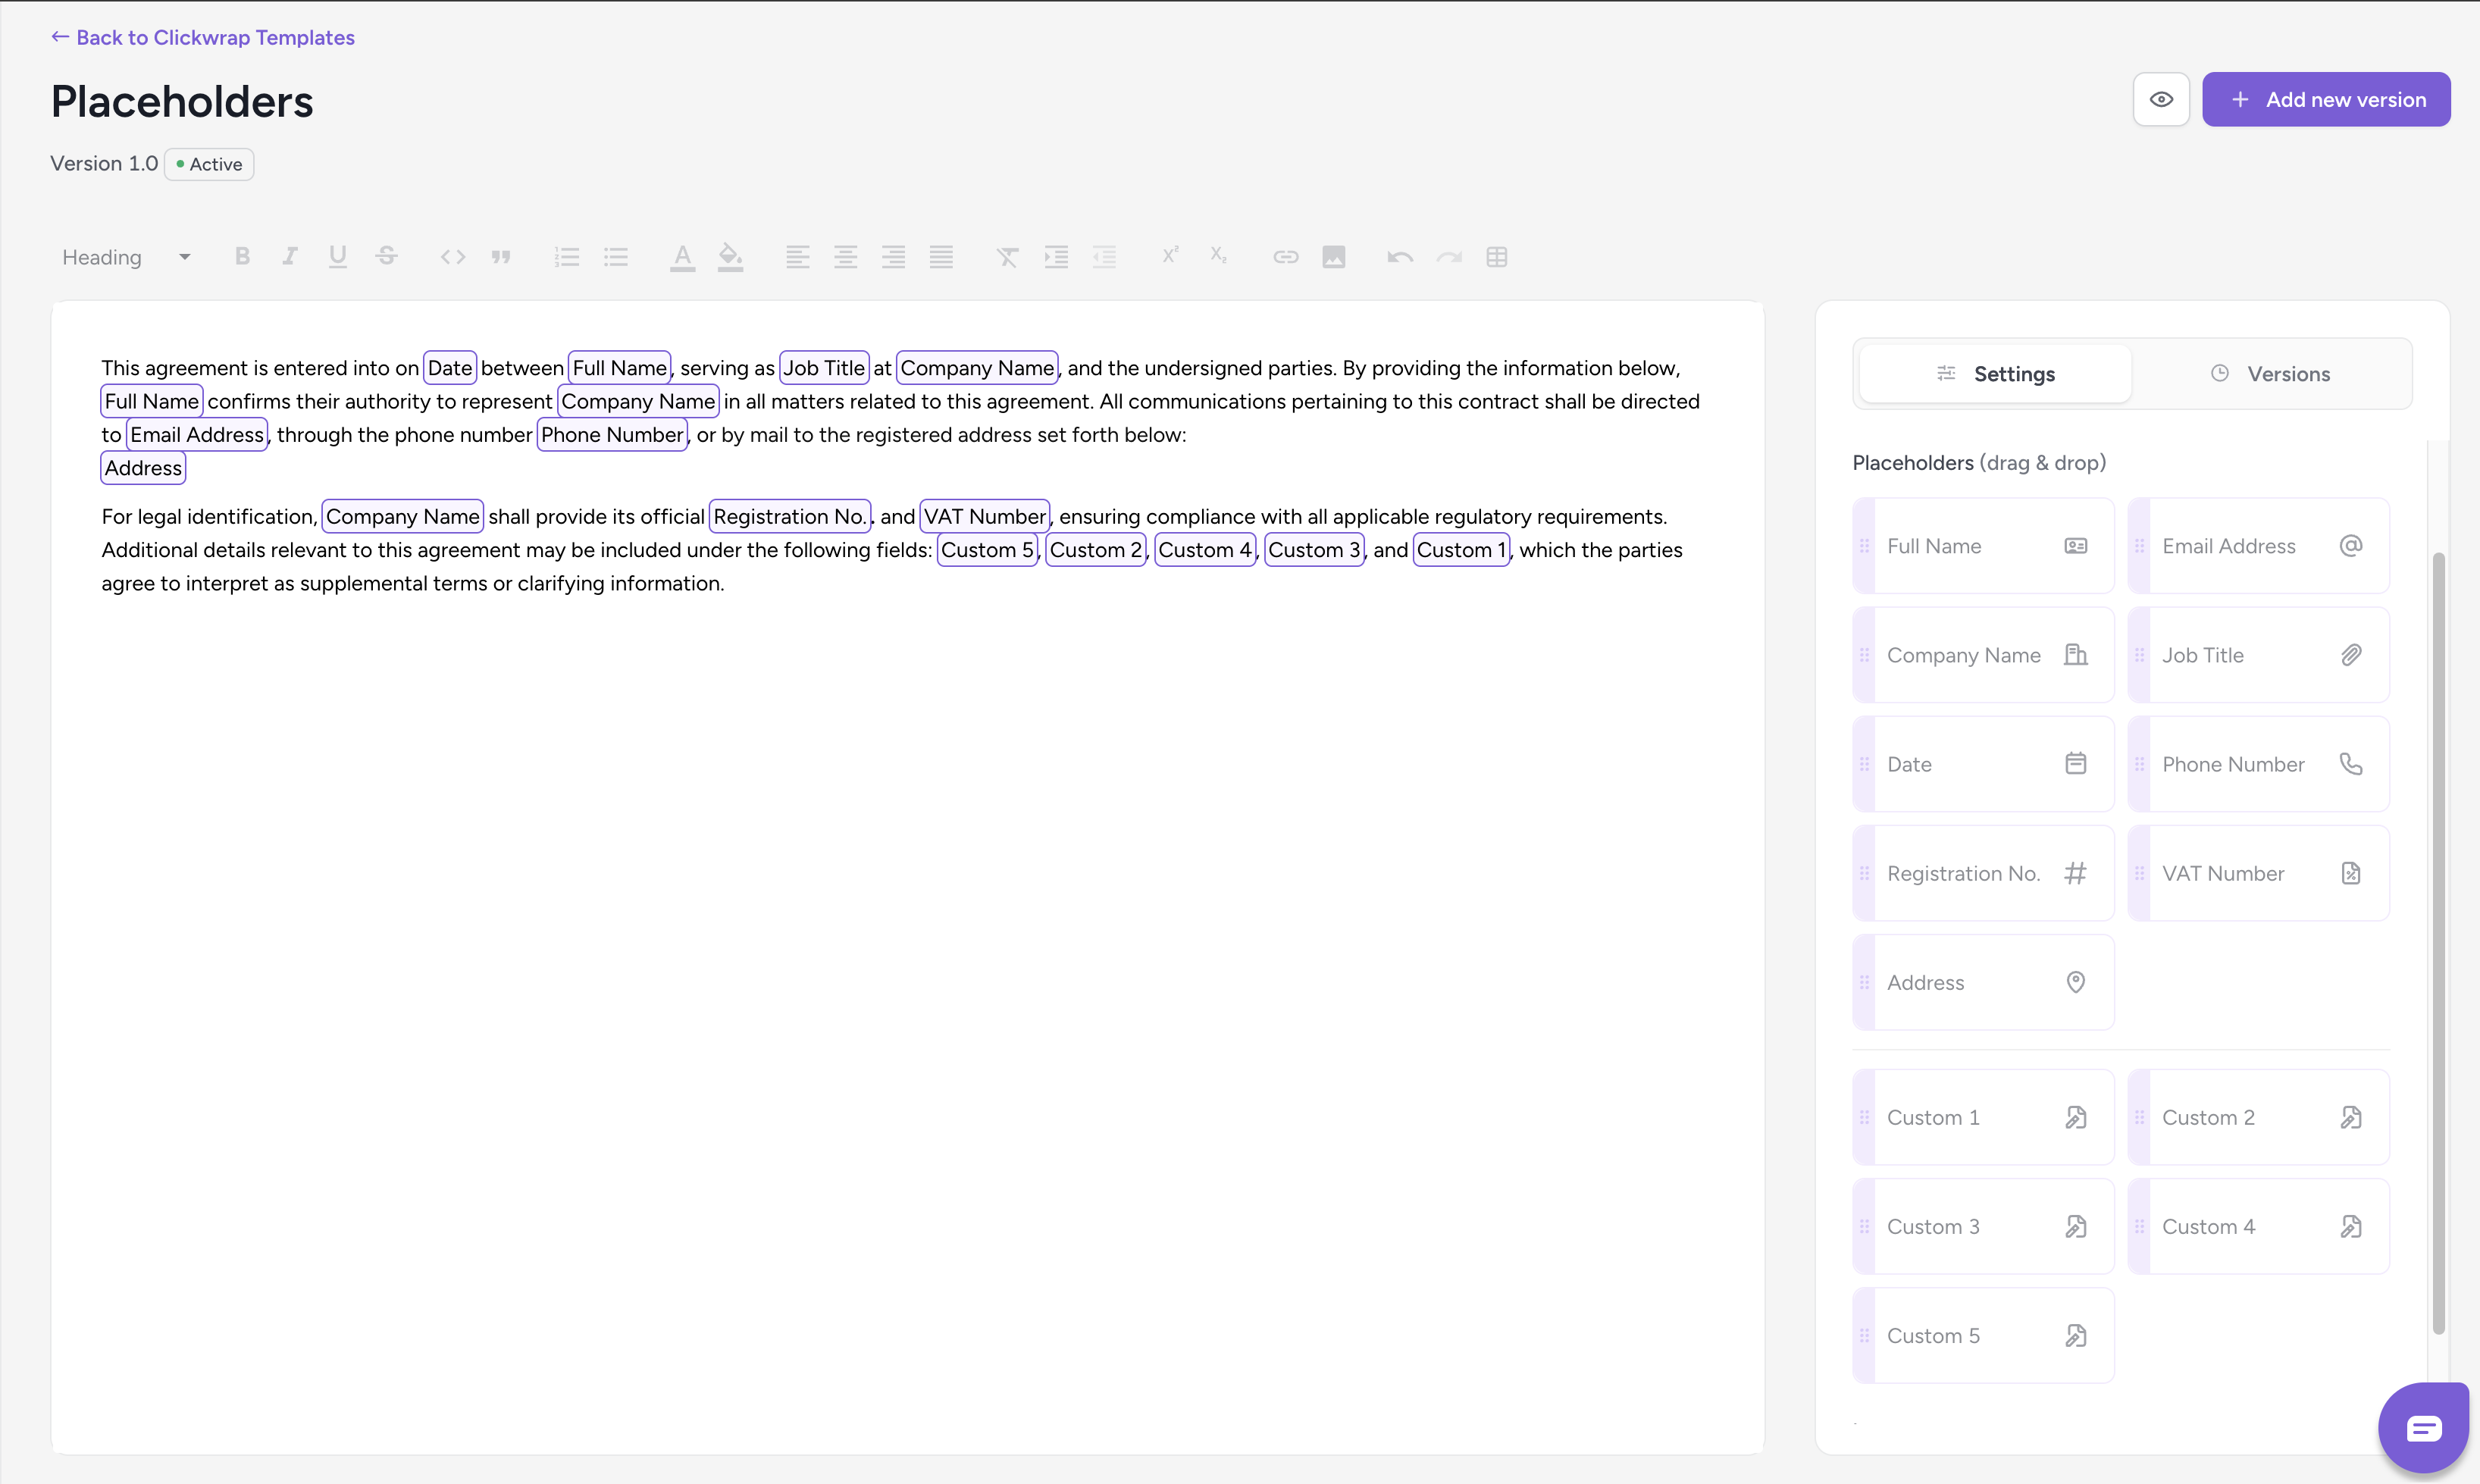
Template placeholders
Placeholders let you inject dynamic, user-specific, or session-specific values into your template content without
changing the published text. Provide the values through your integration whenever a clickwrap flow is triggered to
personalize what each end-user sees. All placeholders are optional. If you omit a value, the placeholder token in the rendered agreement (i.e. the spot in the text where the value would appear) will display a dash (-) so end-users know the field is intentionally blank.
Available placeholders
You can drag and drop any placeholder from the list into the template editor; each one is inserted as a token in your document,
and you can reuse the same placeholder multiple times. You only need to provide values for the placeholders you use. Any placeholder without a supplied value renders as a dash (-) in the final document.
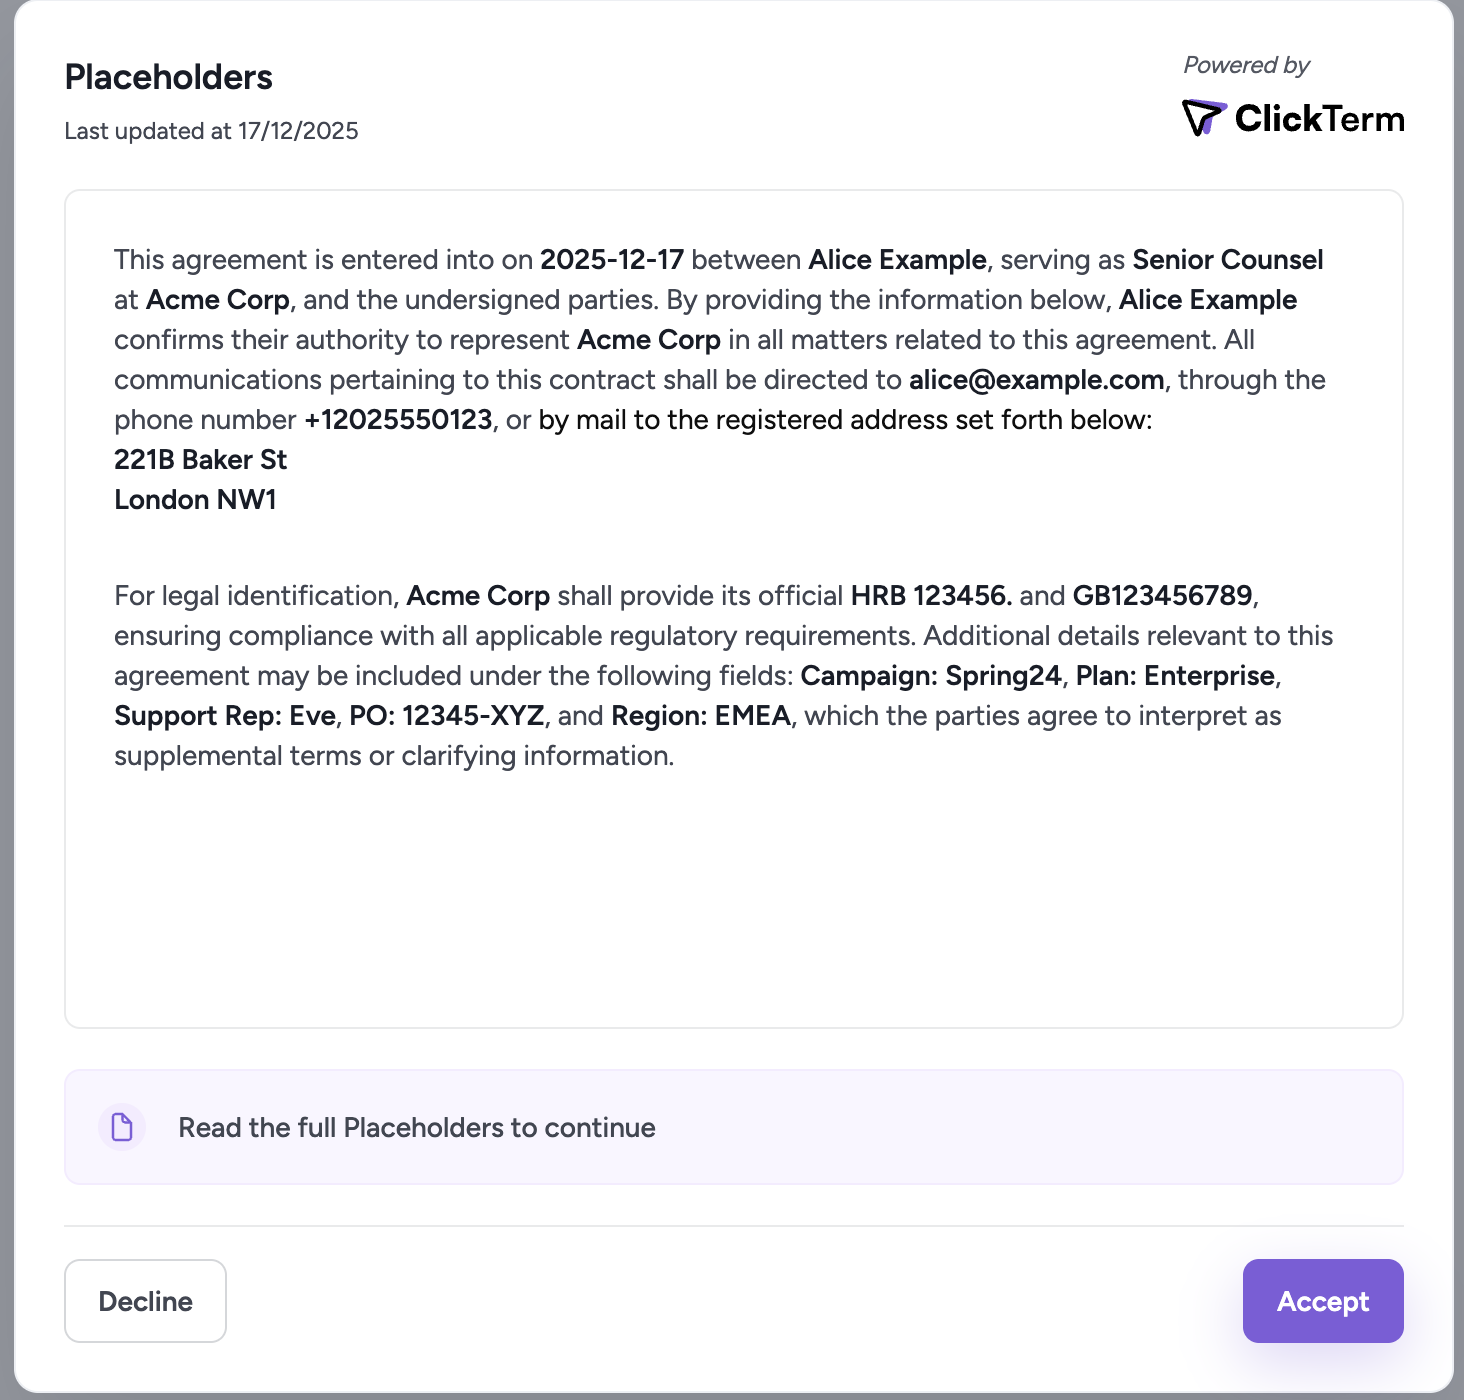
Example including every placeholder token.
const templatePlaceholders = {
    fullName: "Alice Example",
    email: "[email protected]",
    company: "Acme Corp",
    jobTitle: "Senior Counsel",
    phoneNumber: "+12025550123",
    registrationNumber: "HRB 123456",
    vatNumber: "GB123456789",
    address: "221B Baker St\nLondon NW1",
    custom1: "Region: EMEA",
    custom2: "Plan: Enterprise",
    custom3: "PO: 12345-XYZ",
    custom4: "Support Rep: Eve",
    custom5: "Campaign: Spring24"
    // The `date` placeholder is server-generated, so no client-provided value is required.
};

ClicktermDialog.show({
    endUserId: options.endUser,
    clickwrapTemplateId: options.templateId,
    templatePlaceholders,
    language: "en"
}).then((result) => {
    console.log("Clickwrap result:", result);
}).catch((error) => {
    console.error("Clickwrap error:", error);
});
Map<String, Object> templatePlaceholders = new HashMap<>();
templatePlaceholders.put("fullName","Alice Example");
templatePlaceholders.put("email","[email protected]");
templatePlaceholders.put("company","Acme Corp");
templatePlaceholders.put("jobTitle","Senior Counsel");
templatePlaceholders.put("phoneNumber","+12025550123");
templatePlaceholders.put("registrationNumber","HRB 123456");
templatePlaceholders.put("vatNumber","GB123456789");
templatePlaceholders.put("address","221B Baker St\nLondon NW1");
templatePlaceholders.put("custom1","Region: EMEA");
templatePlaceholders.put("custom2","Plan: Enterprise");
templatePlaceholders.put("custom3","PO: 12345-XYZ");
templatePlaceholders.put("custom4","Support Rep: Eve");
templatePlaceholders.put("custom5","Campaign: Spring24");
// The `date` placeholder is server-generated, so no client-provided value is required.

ClickwrapTemplate contentRequestBody = new ClickwrapTemplate("YOUR_CLICKTERM_TEMPLATE_ID", endUserID, templatePlaceholders, "LANGUAGE_CODE");

ClicktermDialog.show(this, contentRequestBody, new ClicktermDialog.OnAgreementResultListener() {
    @Override
    public void onSuccess (String clicktermSignature){
        // Handle success
    }

    @Override
    public void onError (String message){
        // Handle errors
    }
});
List of available placeholders
| Placeholder | Type | Length | Validation |
|---|---|---|---|
fullName |
String | <= 100 | Letters/digits/spaces/basic punctuation |
email |
String | <= 254 | Standard email format validation |
company |
String | <= 100 | Letters/digits/spaces/basic punctuation |
jobTitle |
String | <= 80 | Letters/digits/spaces/basic punctuation |
date |
LocalDate | - | Generated by Clickterm in yyyy-MM-dd format, client values are ignored |
phoneNumber |
String | <= 16 | Digits/spaces/basic punctuation |
registrationNumber |
String | <= 50 | Letters/digits/spaces/basic punctuation |
vatNumber |
String | <= 50 | Same validation as registrationNumber |
address |
String | <= 500 | Letters/digits/spaces/basic punctuation/newlines |
custom1 |
String | <= 255 | Letters/digits/spaces/basic punctuation |
custom2 |
String | <= 255 | Same validation as custom1 |
custom3 |
String | <= 255 | Same validation as custom1 |
custom4 |
String | <= 255 | Same validation as custom1 |
custom5 |
String | <= 255 | Same validation as custom1 |
These placeholders keep every agreement tailored while avoiding separate templates for each user or scenario.
How placeholders work
- Drag a placeholder token into the editor wherever you need dynamic content.
- When calling
ClicktermDialog.show(), pass the placeholder values via thetemplatePlaceholders
Customizing the Clickwrap Dialog
Starting from SDK version 2.1 and above, you can customize the Clickwrap dialog directly from the ClickTerm Web App. No additional SDK configuration is required.
All dialog customization options are managed at the template level in the web interface.
How to Customize a Template
- Open the desired template in the ClickTerm Web App.
Click the "Preview & Customize" button.
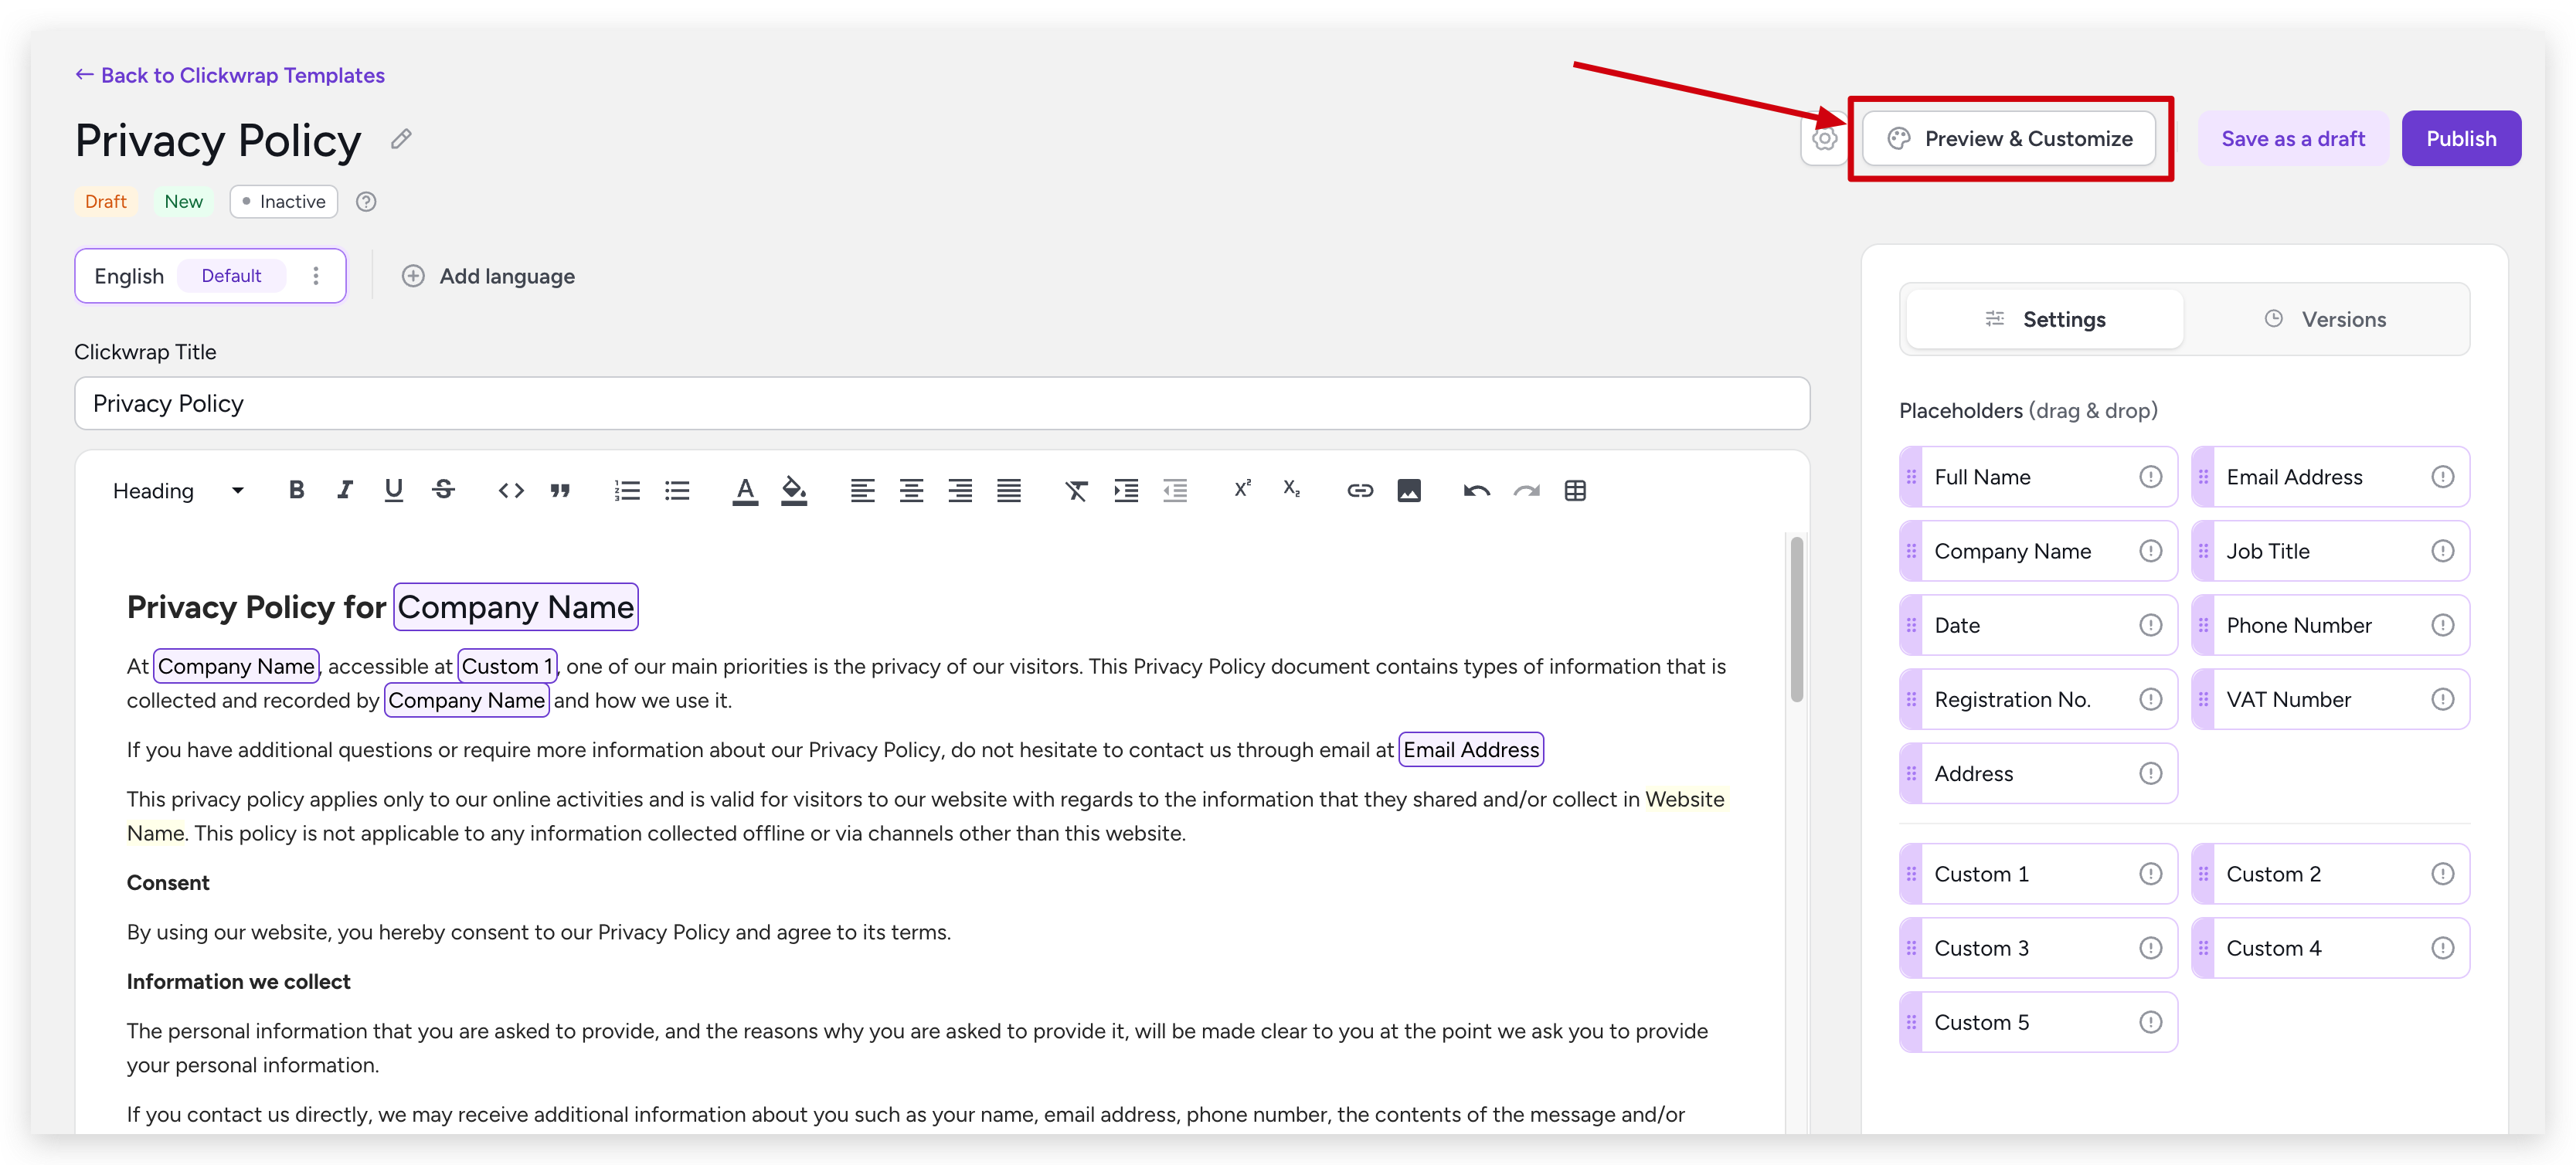
You will be redirected to the customization screen, where you can configure how the dialog will appear to end users.
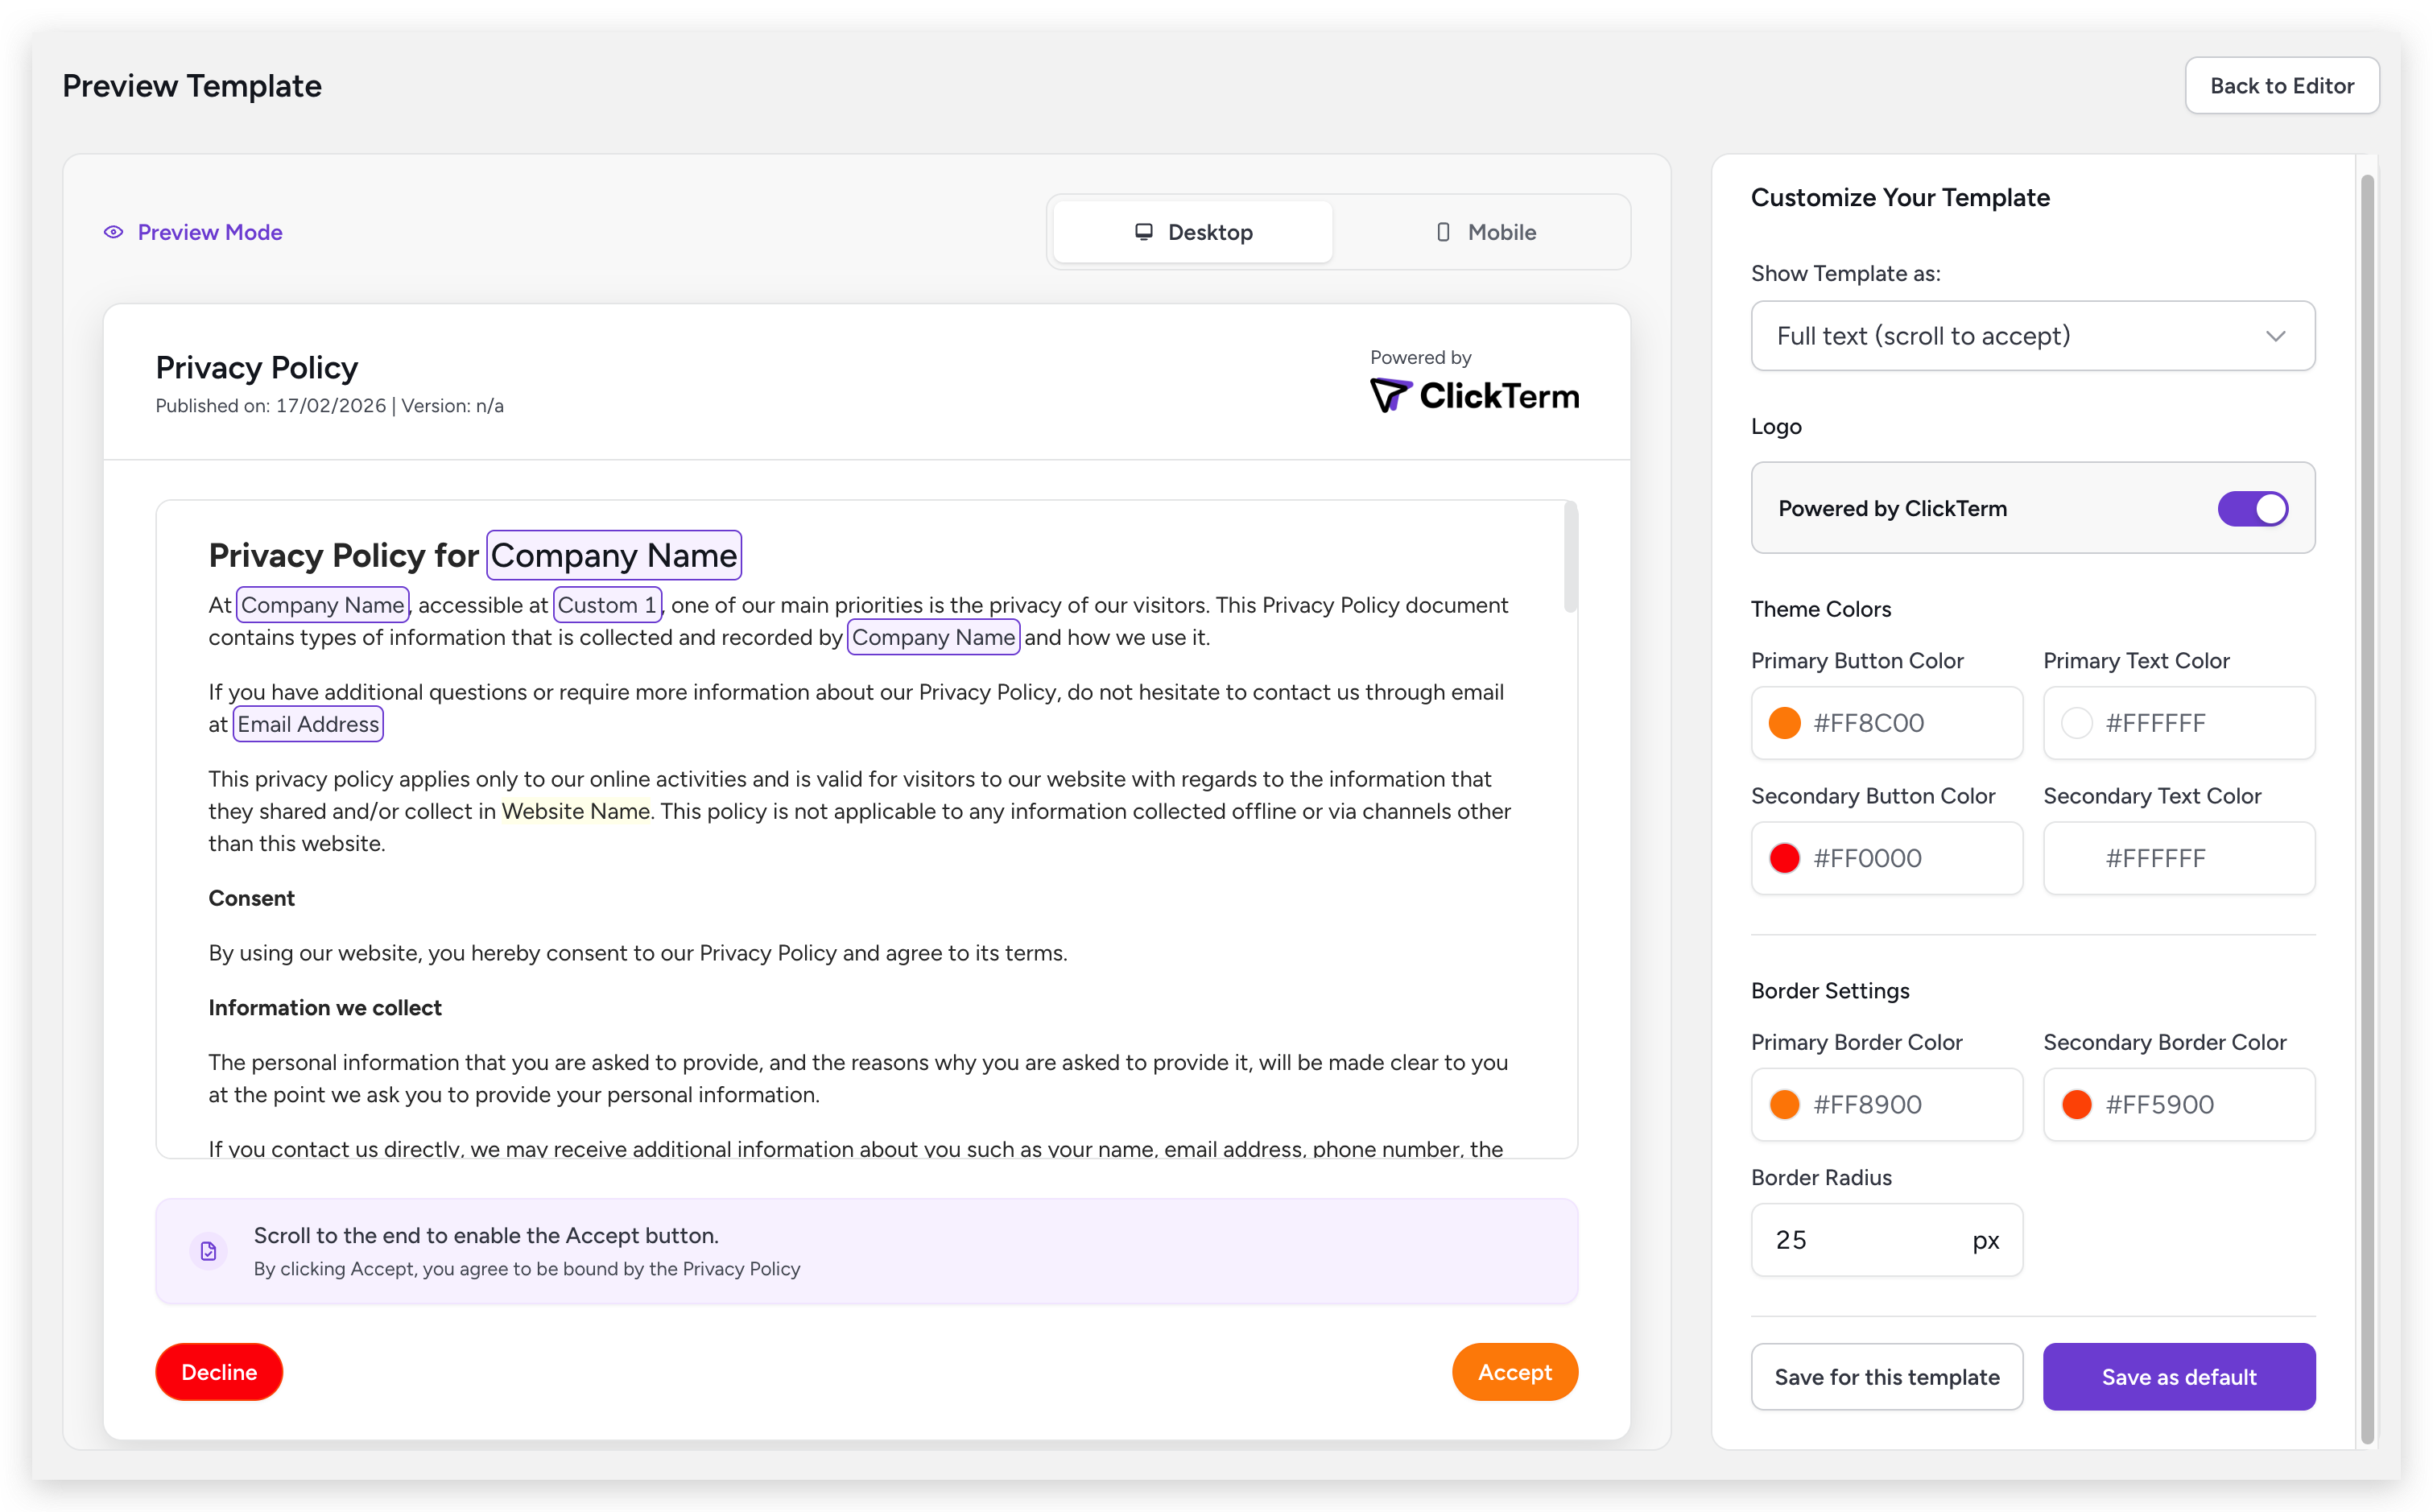
Customization Screen Overview
- Left panel – Displays a real-time preview of the Clickwrap dialog.
- Right panel – Contains all available customization options.
As you modify the settings, the preview updates immediately to reflect your changes.
Saving Your Configuration
You have two saving options:
Save for this template
Applies the configuration only to the current template.Save as default
Sets the configuration as the default for all templates that do not already have their own custom configuration.
Changes will be reflected in the SDK after saving. It might take a few minutes for the new configuration to propagate, so if you don't see the changes immediately, please wait a moment and try again.
Template content version lifecycle
When you publish a new template content version in the ClickTerm UI you must choose an Effective at date and time. That timestamp determines when the new version becomes visible to end users. Until the effective time is reached, the previously effective version (if any) continues to be presented.
| Lifecycle state | When it occurs | End-user visibility |
|---|---|---|
| Scheduled | Effective at is set in the future |
Not visible to end users |
| Effective | Effective at time has been reached for the latest version |
Visible to end users |
| Superseded | A newer version's Effective at time has passed |
No longer shown; retained only for auditing/history |
Verify a Signature
This endpoint lets you verify a Clickterm Signature that was generated when a user accepted a clickwrap (e.g. terms and conditions).
- Your backend receives the signature from the client (website/app).
- You then send it to Clickterm’s /clickwrap/verify API with your App ID and App Key.
- Our system confirms that the signature is authentic and issued by Clickterm, and provides a Certificate of Acceptance.
Why it matters: Verification ensures the signature hasn’t been forged or tampered with, providing proof of consent, security, and legal validity for clickwrap agreements.
Endpoint
POST https://api.clickterm.com/public-client/v1/clickwrap/verify
Verify Signature CURL Examples:
curl -XPOST -H 'X-APP-ID: {YOUR_APP_ID}'
            -H 'X-APP-KEY: {YOUR_APP_KEY}'
            -H "Content-type: application/json"
            -d '{ "clicktermSignature": "{SIGNATURE}"}'
            'https://api.clickterm.com/public-client/v1/clickwrap/verify'
curl -XPOST -H 'X-APP-ID: {YOUR_APP_ID}'
            -H 'X-APP-KEY: {YOUR_APP_KEY}'
            -H "Content-type: application/json"
            -d '{ "clicktermSignature": "{SIGNATURE}"}'
            'https://api.clickterm.com/public-client/v1/clickwrap/verify'
Request body
The request body should be a JSON object with the following structure:
// JSON Request Body

{
    "clicktermSignature": "{SIGNATURE}"
}
// JSON Request Body

{
    "clicktermSignature": "{SIGNATURE}"
}
To verify a Clickterm Signature you need to send a POST request to our Public API from your backend server. You will need to include your Clickterm App ID and Clickterm App Key. You can obtain them from our Integrations menu on the Clickterm web app (app.clickterm.com/integrations).
The request body accepts the following field:
| Parameter | Required | Description |
|---|---|---|
| clicktermSignature | Yes | The Clickterm Signature sent to your backend from your client (website or app). It is returned by the SDK when the end user accepts or declines the clickwrap. |
Response body
The response body will be a JSON object with the following structure:
{
  "clickwrapEventStatus": "string (enum: e.g. ACCEPTED, DECLINED)",
  "clickwrapEventId": "string (UUID)",
  "clickwrapTemplateId": "string (UUID)",
  "clickwrapTemplateVersion": "integer",
  "clickwrapTemplateVersionMinor": "integer",
  "endUserId": "string(256)",
  "templatePlaceholders": "string (nullable, JSON-encoded or null)",
  "technicalMetadata": "string (256)",
  "actionAt": "string (ISO-8601 timestamp)",
  "effectiveAt": "string (ISO-8601 timestamp)"
}

// Example:
{
  "clickwrapEventStatus": "ACCEPTED",
  "clickwrapEventId": "123e4567-e89b-12d3-a456-426614174000",
  "clickwrapTemplateId": "987e6543-e21b-45d3-b321-426614174999",
  "clickwrapTemplateVersion": 1,
  "clickwrapTemplateVersionMinor": 0,
  "endUserId": "423e4567-e89b-12d3-a456-426614174000",
  "templatePlaceholders": "{ \"email\": \"[email protected]\", \"phone\": \"+12345678900\" }",
  "technicalMetadata": "{\"userAgent\":\"okhttp/4.8.1\",\"ip\":\"a100:a100:a100:a100:a100:a100:a100:a100\"}",
  "actionAt": "2025-08-20T14:30:00Z",
  "effectiveAt": "2025-08-20T14:00:00Z"
}
{
  "clickwrapEventStatus": "string (enum: e.g. ACCEPTED, DECLINED)",
  "clickwrapEventId": "string (UUID)",
  "clickwrapTemplateId": "string (UUID)",
  "clickwrapTemplateVersion": 1,
  "clickwrapTemplateVersionMinor": 0,
  "endUserId": "string(256)",
  "templatePlaceholders": "string (nullable, JSON-encoded or null)",
  "technicalMetadata": "string (256)",
  "actionAt": "string (ISO-8601 timestamp)",
  "effectiveAt": "string (ISO-8601 timestamp)"
}
This request returns the following information:
| Parameter | Type | Description |
|---|---|---|
| clickwrapEventStatus | String | The result from the user's interaction with the Clickwrap modal dialog. (ACCEPTED or DECLINED). |
| clickwrapEventId | UUID | The Id of this particular Clickwrap Event. Can also be consulted on the Clickterm web app. |
| clickwrapTemplateId | UUID | The Id of the Clickwrap Template shown to the end-user. |
| clickwrapTemplateVersion | Integer | The version of the Clickwrap Template used for this event. |
| clickwrapTemplateVersionMinor | Integer | The minor version of the Clickwrap Template used for this event. |
| endUserId | String | The endUser identifier linked to this Event |
| templatePlaceholders | String | The list of values that was used to replace the placeholders in your Clickwrap Template. |
| technicalMetadata | String | The metadata gathered from the end-user client at the time of the Event (IP Address, user-agent, etc) |
| actionAt | Timestamp (UTC, ISO-8601) | The timestamp the user's action took place at for this Clickwrap Event. |
| effectiveAt | Timestamp (UTC, ISO-8601) | When this template version became the one shown to end users. |
Template Lifecycle Tooling
Treat the sections below as add-ons to the baseline “show → sign → verify” journey. Understand which templates are active for an app and whether a specific end user already acted on them.
Use these APIs when you need to:
Gate a flow ahead of time. - Call
Get Clickwrap Templatesto see the agreements that apply, andGet Clickwrap Status for End UserBuild internal or customer dashboards. - Show template tags, effective dates, and overdue states so ops and support teams can quickly identify end users without digging through logs.
Audit consent outside of the main flow. - Quickly answer “is this user still missing any required agreement?” without triggering the clickwrap modal itself.
Get Clickwrap Templates
This endpoint returns a list of enabled clickwrap templates with details of the effective version, which is the version shown to end users for acceptance. Use the response to determine which templates should be presented or enforced for the end user.
Templates can be configured with custom tags via the ClickTerm UI to support flexible categorization such as user types, registration-only flags, or required flows.
Endpoint
GET https://api.clickterm.com/public-client/v1/clickwrap-templates
Get Clickwrap Templates for End User CURL Examples:
curl -XGET  -H 'X-APP-ID: {YOUR_APP_ID}' \
            -H 'X-APP-KEY: {YOUR_APP_KEY}' \
            'https://api.clickterm.com/public-client/v1/clickwrap-templates?tags=registrationOnly&tags=required'
curl -XGET  -H 'X-APP-ID: {YOUR_APP_ID}' \
            -H 'X-APP-KEY: {YOUR_APP_KEY}' \
            'https://api.clickterm.com/public-client/v1/clickwrap-templates?tags=registrationOnly&tags=required'
URL Parameters
| Parameter | Required | Description |
|---|---|---|
| tags | No | Optional repeatable query parameter to filter templates by custom tags |
Response body
The response body is a JSON array where each entry represents one clickwrap template:
    [
        {
            "clickwrapTemplateId": "string (UUID)",
            "clickwrapTemplateName": "string",
            "clickwrapTemplateVersion": "integer",
            "clickwrapTemplateVersionMinor": "integer",
            "tags": ["string"],
            "effectiveAt": "string (ISO-8601 timestamp)",
            "mustAcceptBy": "string (ISO-8601 timestamp or null)"
        }
    ]

// Example:
    [
        {
            "clickwrapTemplateId": "987e6543-e21b-45d3-b321-426614174999",
            "clickwrapTemplateName": "Terms of Service",
            "clickwrapTemplateVersion": 2,
            "clickwrapTemplateVersionMinor": 0,
            "tags": ["registration", "customer_only"],
            "effectiveAt": "2025-08-20T14:00:00Z",
            "mustAcceptBy": null
        },
        {
            "clickwrapTemplateId": "123e4567-e89b-12d3-a456-426614174000",
            "clickwrapTemplateName": "Privacy Policy",
            "clickwrapTemplateVersion": 1,
            "clickwrapTemplateVersionMinor": 3,
            "tags": [],
            "effectiveAt": "2025-09-01T00:00:00Z",
            "mustAcceptBy": "2025-10-01T00:00:00Z"
        }
    ]
    [
        {
        "clickwrapTemplateId":"string (UUID)",
        "clickwrapTemplateName":"string",
        "clickwrapTemplateVersion":"integer",
        "clickwrapTemplateVersionMinor":"integer",
        "tags":["string"],
        "effectiveAt":"string (ISO-8601 timestamp)",
        "mustAcceptBy":"string (ISO-8601 timestamp or null)"
        }
    ]
This request returns the following fields per template:
| Field | Type | Description |
|---|---|---|
| clickwrapTemplateId | UUID | Unique identifier of the clickwrap template to be shown to the end user. |
| clickwrapTemplateName | String | Display name of the clickwrap template. |
| clickwrapTemplateVersion | Integer | The active major version of the template. |
| clickwrapTemplateVersionMinor | Integer | The active minor version of the template. |
| tags | String[] | Array of custom string tags associated with the template (empty array if none are configured). |
| effectiveAt | Timestamp (UTC, ISO-8601) | When this template version became visible to end users. |
| mustAcceptBy | Timestamp (UTC, ISO-8601) | Optional informational deadline configured in the ClickTerm UI. |
Get Clickwrap Status for End User
This endpoint returns the current status of all applicable clickwrap templates for a specific end user.
It allows clients to determine whether each required clickwrap has been presented, accepted, declined, or has no recorded interaction.
The endpoint returns a clickwrap’s current status only when the end user has acted on its latest major version.
Actions on older major versions result in a NO_DATA status with a null timestamp, ensuring consent aligns with the most recent agreement.
Endpoint
GET https://api.clickterm.com/public-client/v1/clickwraps/{endUserId}/status
Get End-User Clickwrap Statuses CURL Examples:
curl - XGET - H 'X-APP-ID: {YOUR_APP_ID}' \
            -H 'X-APP-KEY: {YOUR_APP_KEY}' \
            'https://api.clickterm.com/public-client/v1/clickwraps/{endUserId}/status'
curl -XGET -H 'X-APP-ID: {YOUR_APP_ID}' \
        -H 'X-APP-KEY: {YOUR_APP_KEY}' \
        'https://api.clickterm.com/public-client/v1/clickwraps/{endUserId}/status'
URL Parameters
| Parameter | Required | Description |
|---|---|---|
| endUserId | Yes | Unique identifier of the targeted end user. |
Response body
The response body is a JSON array where each entry represents one clickwrap template status:
    [
        {
            "clickwrapTemplateId": "string (UUID)",
            "clickwrapTemplateName": "string",
            "clickwrapTemplateVersion": "integer",
            "clickwrapTemplateVersionMinor": "integer",
            "clickwrapEventId": "string (UUID or null)",
            "status": "string (enum, see below)",
            "lastStatusUpdate": "string (ISO-8601 timestamp or null)",
            "tags": ["string"],
            "effectiveAt": "string (ISO-8601 timestamp)",
            "mustAcceptBy": "string (ISO-8601 timestamp or null)"
        }
    ]

// Example:
    [
        {
            "clickwrapTemplateId": "987e6543-e21b-45d3-b321-426614174999",
            "clickwrapTemplateName": "Terms of Service",
            "clickwrapTemplateVersion": 2,
            "clickwrapTemplateVersionMinor": 0,
            "clickwrapEventId": "b5f0d8f9-6f4f-4ab4-9e74-5c6dd0fbb123",
            "status": "ACCEPTED",
            "lastStatusUpdate": "2025-09-18T10:22:14Z",
            "tags": ["registration", "customer_only"],
            "effectiveAt": "2025-08-20T14:00:00Z",
            "mustAcceptBy": null
        },
        {
            "clickwrapTemplateId": "123e4567-e89b-12d3-a456-426614174000",
            "clickwrapTemplateName": "Privacy Policy",
            "clickwrapTemplateVersion": 1,
            "clickwrapTemplateVersionMinor": 3,
            "clickwrapEventId": null,
            "status": "NO_DATA",
            "lastStatusUpdate": null,
            "tags": [],
            "effectiveAt": "2025-09-01T00:00:00Z",
            "mustAcceptBy": "2025-10-01T00:00:00Z"
        }
    ]
    [
        {
        "clickwrapTemplateId":"string (UUID)",
        "clickwrapTemplateName":"string",
        "clickwrapTemplateVersion":"integer",
        "clickwrapTemplateVersionMinor":"integer",
        "clickwrapEventId":"string (UUID or null)",
        "status":"string (enum)",
        "lastStatusUpdate":"string (ISO-8601 timestamp or null)",
        "tags":["string"],
        "effectiveAt":"string (ISO-8601 timestamp)",
        "mustAcceptBy":"string (ISO-8601 timestamp or null)"
        }
    ]
This request returns the following fields per template:
| Field | Type | Description |
|---|---|---|
| clickwrapTemplateId | UUID | Unique identifier of the clickwrap template. |
| clickwrapTemplateName | String | Display name of the clickwrap template. |
| clickwrapTemplateVersion | Integer | Major version of the template associated with this status. |
| clickwrapTemplateVersionMinor | Integer | Minor version of the template associated with this status. |
| clickwrapEventId | UUID | Identifier of the related clickwrap event. |
| status | String | Current interaction status of the end user (see possible status values below). |
| lastStatusUpdate | Timestamp (UTC, ISO-8601) | The most recent status change, or null if no interaction is recorded. |
| tags | String[] | Array of custom string tags associated with the template (empty array if none are configured). |
| effectiveAt | Timestamp (UTC, ISO-8601) | When the referenced template version became effective, i.e., the version presented to end users. |
| mustAcceptBy | Timestamp (UTC, ISO-8601) | Optional informational deadline configured in the ClickTerm UI. |
When status is UNVERIFIED, PENDING, ACCEPTED, or DECLINED, the response includes clickwrapEventId. You can use that value directly with the certificate and agreement download endpoints when the status is ACCEPTED, without needing to store the event ID separately.
When status is NO_DATA or OVERDUE, this field is null.
Possible status values
| Status | Description |
|---|---|
| NO_DATA | The end user has no recorded interaction with the clickwrap. |
| PENDING | The clickwrap has been presented to the end user but no action has been taken yet. |
| UNVERIFIED | The end user has taken an action, but the event has not yet been verified by the client’s server. |
| ACCEPTED | The event has been verified and the clickwrap was accepted. |
| DECLINED | The event has been verified and the clickwrap was declined. |
| OVERDUE | The mustAcceptBy deadline has passed with no recorded end-user interaction. Unlike NO_DATA, this status signals that your configured deadline was missed. The clickwrap continues to be presented and transitions through the same flow as NO_DATA once the user acts: PENDING → UNVERIFIED → ACCEPTED / DECLINED. |
Agreement Evidence Flow
Pull down the PDFs, event metadata, and rendered content that users have already acted on so you can archive them, expose them in customer portals, or support internal investigations.
Get Clickwrap Event Details
This endpoint lets you retrieve the full metadata for a Clickwrap Event after it has been verified. Use it to audit the Clickwrap lifecycle, cross-check template versions, or drive downstream workflows once the agreement is accepted.
Endpoint
GET https://api.clickterm.com/public-client/v1/clickwrap-events/{clickwrapEventId}/details
Get Clickwrap Event details CURL Examples:
curl -XGET -H 'X-APP-ID: {YOUR_APP_ID}' \
            -H 'X-APP-KEY: {YOUR_APP_KEY}' \
            'https://api.clickterm.com/public-client/v1/clickwrap-events/{clickwrapEventId}/details'
curl -XGET -H 'X-APP-ID: {YOUR_APP_ID}' \
            -H 'X-APP-KEY: {YOUR_APP_KEY}' \
            'https://api.clickterm.com/public-client/v1/clickwrap-events/{clickwrapEventId}/details'
URL Parameters
| URL Parameter | Required | Description |
|---|---|---|
| clickwrapEventId | Yes | The identifier for the Clickwrap Event you want to inspect. |
Response body
The response body will be a JSON object with the following structure:
{
  "clickwrapEventStatus": "string (enum: e.g. ACCEPTED, DECLINED)",
  "clickwrapEventId": "string (UUID)",
  "clickwrapTemplateId": "string (UUID)",
  "clickwrapTemplateVersion": "integer",
  "clickwrapTemplateVersionMinor": "integer",
  "endUserId": "string(256)",
  "templatePlaceholders": "string (nullable, JSON-encoded or null)",
  "technicalMetadata": "string (256)",
  "presentedAt": "string (ISO-8601 timestamp)",
  "actionAt": "string (ISO-8601 timestamp)",
  "effectiveAt": "string (ISO-8601 timestamp)"
}

// Example
{
  "clickwrapEventStatus": "ACCEPTED",
  "clickwrapEventId": "123e4567-e89b-12d3-a456-426614174000",
  "clickwrapTemplateId": "987e6543-e21b-45d3-b321-426614174999",
  "clickwrapTemplateVersion": 1,
  "clickwrapTemplateVersionMinor": 0,
  "endUserId": "423e4567-e89b-12d3-a456-426614174000",
  "templatePlaceholders": "{ \"email\": \"[email protected]\", \"phone\": \"+12345678900\" }",
  "technicalMetadata": "{\"userAgent\":\"okhttp/4.8.1\",\"ip\":\"a100:a100:a100:a100:a100:a100:a100:a100\"}",
  "presentedAt": "2025-08-20T14:25:00Z",
  "actionAt": "2025-08-20T14:30:00Z",
  "effectiveAt": "2025-08-20T14:00:00Z"
}
{
  "clickwrapEventStatus": "string (enum: e.g. ACCEPTED, DECLINED)",
  "clickwrapEventId": "string (UUID)",
  "clickwrapTemplateId": "string (UUID)",
  "clickwrapTemplateVersion": "integer",
  "clickwrapTemplateVersionMinor": "integer",
  "endUserId": "string(256)",
  "templatePlaceholders": "string (nullable, JSON-encoded or null)",
  "technicalMetadata": "string (256)",
  "presentedAt": "string (ISO-8601 timestamp)",
  "actionAt": "string (ISO-8601 timestamp)",
  "effectiveAt": "string (ISO-8601 timestamp)"
}
This request returns the following information:
| Parameter | Type | Description |
|---|---|---|
| clickwrapEventStatus | String | The result from the user's interaction with the Clickwrap modal dialog. (ACCEPTED or DECLINED). |
| clickwrapEventId | UUID | The Id of this particular Clickwrap Event. |
| clickwrapTemplateId | UUID | The Id of the Clickwrap Template shown to the end user. |
| clickwrapTemplateVersion | Integer | The version of the Clickwrap Template used for this event. |
| clickwrapTemplateVersionMinor | Integer | The minor version of the Clickwrap Template used for this event. |
| endUserId | String | The end user identifier linked to this Event. |
| templatePlaceholders | String | The list of values that was used to replace the placeholders in your Clickwrap Template. |
| technicalMetadata | String | The metadata gathered from the end-user client at the time of the Event (IP Address, user-agent, etc). |
| presentedAt | Timestamp (UTC, ISO-8601) | When the Clickwrap agreement was presented to the end user. |
| actionAt | Timestamp (UTC, ISO-8601) | When the user's action took place for this Clickwrap Event. |
| effectiveAt | Timestamp (UTC, ISO-8601) | When the clickwrap version tied to the event became visible to end users. |
Download Certificate of Acceptance
This endpoint lets you retrieve the Certificate of Acceptance for a Clickterm Event that has been verified and has clickwrapEventStatus: ACCEPTED.
Certificate of Acceptance: A digitally signed PDF that proves a specific user accepted a specific Clickwrap Version at a specific time.
The certificate includes metadata such as the user ID, timestamp, IP address, and user-agent (browser/device information). It is stored in immutable S3 storage at the time of Clickterm Event Verification and serves as admissible proof in legal and compliance contexts.
Endpoint
GET https://api.clickterm.com/public-client/v1/clickwrap-events/{clickwrapEventId}/certificate
Example:
curl -XGET -H 'X-APP-ID: {YOUR_APP_ID}'
            -H 'X-APP-KEY: {YOUR_APP_KEY}'
            'https://api.clickterm.com/public-client/v1/clickwrap-events/{clickwrapEventId}/certificate'
curl -XGET -H 'X-APP-ID: {YOUR_APP_ID}'
            -H 'X-APP-KEY: {YOUR_APP_KEY}'
            'https://api.clickterm.com/public-client/v1/clickwrap-events/{clickwrapEventId}/certificate'
URL Parameters
| URL Parameter | Required | Description |
|---|---|---|
| clickwrapEventId | Yes | The identifier for the Clickwrap Event from which you want to retrieve the Certificate of Acceptance. |
Download Clickwrap Agreement (incl. Certificate of Acceptance)
This endpoint lets you retrieve the Clickwrap Agreement for a Clickterm Event that has been verified and has clickwrapEventStatus: ACCEPTED.
Clickwrap Agreement: A final, immutable PDF that represents exactly what the End User agreed to at the time of acceptance. It is composed of:
- Accepted Clickwrap Content — the fully rendered agreement text with all placeholders resolved, exactly as presented to the End User at acceptance time.
- Certificate of Acceptance (CoA) — appended at the end of the same PDF.
The Accepted Clickwrap Content and the CoA included in the agreement belong to the same Clickwrap Event and Clickwrap Version.
Endpoint
GET https://api.clickterm.com/public-client/v1/clickwrap-events/{clickwrapEventId}/agreement
Example:
curl -XGET -H 'X-APP-ID: {YOUR_APP_ID}'
            -H 'X-APP-KEY: {YOUR_APP_KEY}'
            'https://api.clickterm.com/public-client/v1/clickwrap-events/{clickwrapEventId}/agreement'
curl -XGET -H 'X-APP-ID: {YOUR_APP_ID}'
            -H 'X-APP-KEY: {YOUR_APP_KEY}'
            'https://api.clickterm.com/public-client/v1/clickwrap-events/{clickwrapEventId}/agreement'
URL Parameters
| URL Parameter | Required | Description |
|---|---|---|
| clickwrapEventId | Yes | The identifier for the Clickwrap Event from which you want to retrieve the Clickwrap Agreement. |
Show Agreed Content
You can call showAcceptedContent to show the agreed content to your end user if they have already accepted the Clickwrap template. Please make sure you have initialized the SDK as shown in the Initialization section.
This is how you can show the agreement to your end user.
ClicktermDialog.showAcceptedContent({
    endUserId: options.endUser,
    clickwrapTemplateId: options.templateId,
}).then((result) => {
    console.log('Clickwrap result:', result);
    // The response will contain the agreed content ...
}).catch((error) => {
    console.error('Clickwrap error:', error);
});
ClickwrapAcceptedAgreementRequest request = new ClickwrapAcceptedAgreementRequest(templateId, endUserId, "en");
ClicktermDialog.showAcceptedContent(this, request, new ClicktermDialog.OnAcceptedContentListener() {
    @Override
    public void onSuccess(ClickwrapTemplateContent content) {
        Log.i("Clickterm result: ", content.getContent());
        // The response will contain the agreed content ...
    }

    @Override
    public void onError(String message) {
        Log.e("Clickterm error: ", message);
    }
});
To request the accepted content, you need to provide the following parameters:
| Parameter | Required | Description |
|---|---|---|
| clickwrapTemplateId | Yes | The ID of your Clickwrap template. You can obtain this from the Clickterm web app after creating a template. |
| endUserId | Yes | String 256 max length. The identifier we will use in Clickterm to identify your endUser's events. If your userId is not known yet you can generate a UUID and map it to your userId in your backend |
Webhooks / Callback URL
Use webhooks to receive verified clickwrap outcomes in your backend automatically. This keeps your integration simple and makes adoption frictionless: once configured, your system gets notified without polling.
How it works
- Your frontend (SDK or API client) collects an end-user action.
- Your backend calls the Verify Signature endpoint to validate the clickwrap event.
- ClickTerm verifies and finalizes the event.
- ClickTerm sends an HTTPS
POSTto your configured callback URL.
Configuration steps
1) Configure callback URL in ClickTerm UI
In your app configuration:
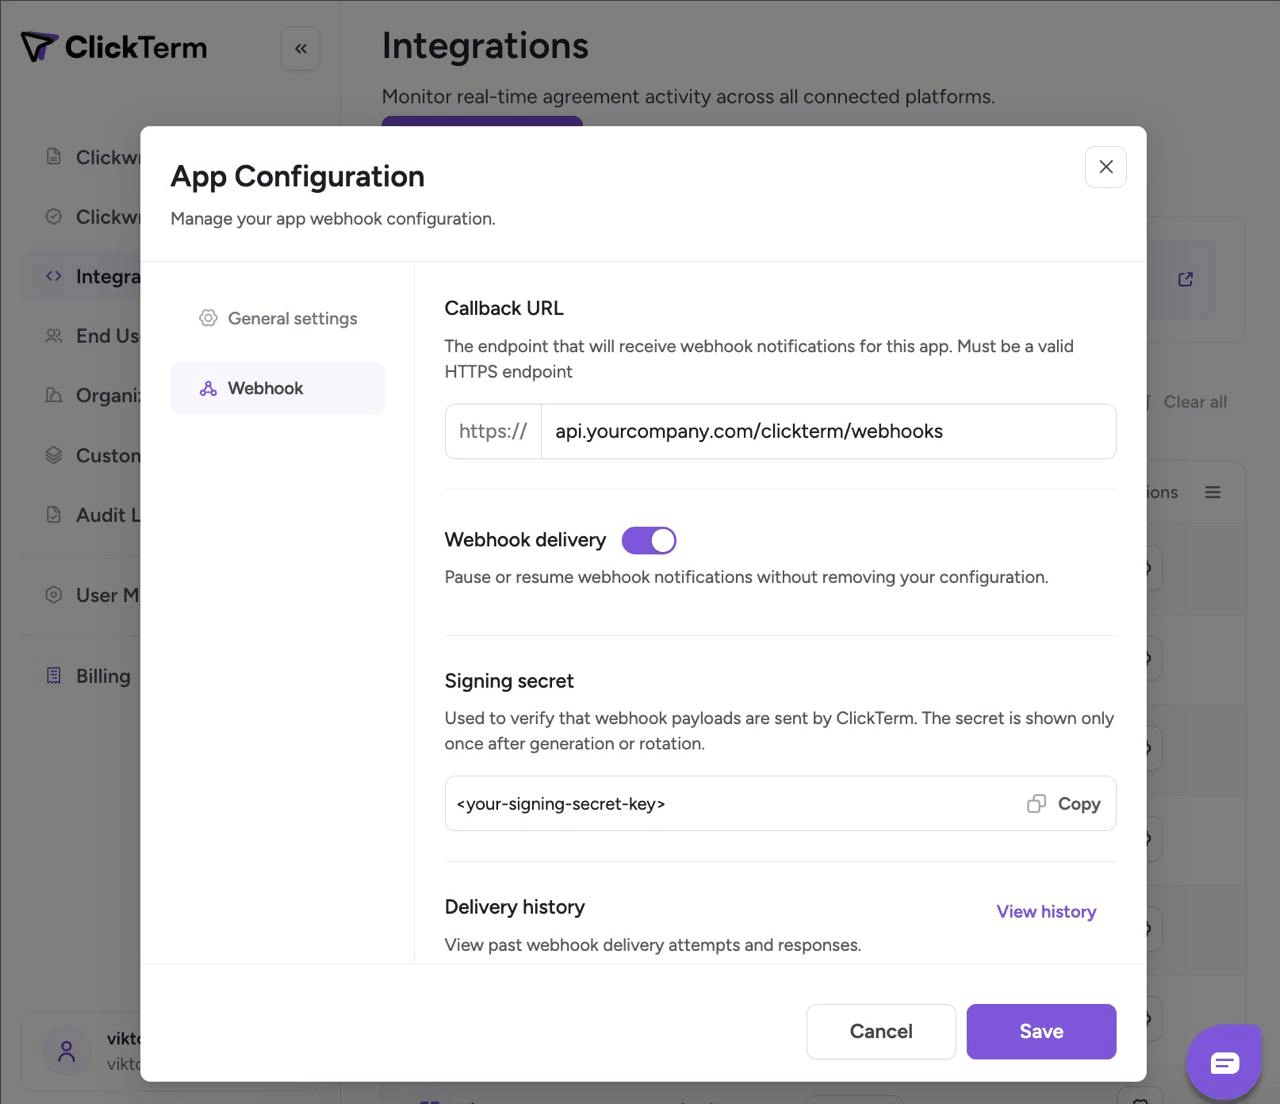
- Set a public HTTPS callback URL (for example:
https://api.yourcompany.com/clickterm/webhooks). - Enable callback delivery.
- Save the generated callback signing secret in your backend secret manager.
2) Expose a webhook endpoint in your backend
- Accept
POSTrequests. - Read the raw request body (do not reformat before signature validation).
- Verify the signature header using your callback signing secret.
- Return
200after successful verification and processing.
Webhook request
Webhook callbacks are sent as HTTP POST requests with JSON payloads.
Headers
| Header | Description |
|---|---|
Content-Type |
Always application/json. |
X-Clickterm-Signature |
HMAC SHA-256 signature for request authenticity verification. |
X-Clickterm-Timestamp |
Unix timestamp (seconds) when the webhook was generated. |
Payload
The request body is a JSON object with the following structure:
{
  "eventType": "string (enum: e.g. CLICKWRAP_EVENT_VERIFIED)",
  "data": Object
}
{
  "eventType": "string (enum: e.g. CLICKWRAP_EVENT_VERIFIED)",
  "data": Object
}
All webhook callbacks are sent as JSON with the following envelope:
| Field | Type | Description |
|---|---|---|
eventType |
String | Event identifier. Determines the structure of data. |
data |
Object | Event payload. Shape depends on eventType. |
Event types
The following event types are currently supported:
| Event Type | Description |
|---|---|
CLICKWRAP_EVENT_VERIFIED |
Triggered when a clickwrap event has been successfully verified and finalized. |
CLICKWRAP_EVENT_VERIFIED
This event is sent after a clickwrap event has been successfully verified and finalized.
Payload (data object)
For the
CLICKWRAP_EVENT_VERIFIEDevent type, thedatafield contains the following structure:
{
  "clickwrapEventId": "string (UUID)",
  "clickwrapTemplateId": "string (UUID)",
  "clickwrapTemplateVersion": "integer",
  "clickwrapTemplateVersionMinor": "integer",
  "endUserId": "string(256)",
  "templatePlaceholders": "string (nullable, JSON-encoded or null)",
  "technicalMetadata": "string (256)",
  "actionAt": "string (ISO-8601 timestamp)",
  "effectiveAt": "string (ISO-8601 timestamp)",
  "clickwrapEventStatus": "string (enum: e.g. ACCEPTED, DECLINED)",
}

// Example
{
  "eventType": "CLICKWRAP_EVENT_VERIFIED",
  "data": {
    "clickwrapEventId": "2d6cfb0f-88f0-44be-9642-68f5244a1c3d",
    "clickwrapTemplateId": "f13d7494-45ea-498f-a1a8-f7cbdf8f5fe0",
    "clickwrapTemplateVersion": 3,
    "clickwrapTemplateVersionMinor": 1,
    "endUserId": "external-user-12345",
    "templatePlaceholders": "{\"fullName\":\"TestUser\"}",
    "technicalMetadata": "{\"userAgent\":\"PostmanRuntime/7.51.1\",\"ip\":\"11.11.11.11\"}",
    "actionAt": "2026-02-20T14:32:41Z",
    "effectiveAt": "2026-02-20T14:02:41Z",
    "clickwrapEventStatus": "ACCEPTED"
  }
}
{
  "clickwrapEventId": "string (UUID)",
  "clickwrapTemplateId": "string (UUID)",
  "clickwrapTemplateVersion": "integer",
  "clickwrapTemplateVersionMinor": "integer",
  "endUserId": "string(256)",
  "templatePlaceholders": "string (nullable, JSON-encoded or null)",
  "technicalMetadata": "string (256)",
  "effectiveAt": "string (ISO-8601 timestamp)",
  "actionAt": "string (ISO-8601 timestamp)",
  "clickwrapEventStatus": "string (enum: e.g. ACCEPTED, DECLINED)",
}

// Example
{
  "eventType": "CLICKWRAP_EVENT_VERIFIED",
  "data": {
    "clickwrapEventId": "2d6cfb0f-88f0-44be-9642-68f5244a1c3d",
    "clickwrapTemplateId": "f13d7494-45ea-498f-a1a8-f7cbdf8f5fe0",
    "clickwrapTemplateVersion": 3,
    "clickwrapTemplateVersionMinor": 1,
    "endUserId": "external-user-12345",
    "templatePlaceholders": "{\"fullName\":\"TestUser\"}",
    "technicalMetadata": "{\"userAgent\":\"PostmanRuntime/7.51.1\",\"ip\":\"11.11.11.11\"}",
    "actionAt": "2026-02-20T14:32:41Z",
    "effectiveAt": "2026-02-20T14:02:41Z",
    "clickwrapEventStatus": "ACCEPTED"
  }
}
| Field | Type | Description |
|---|---|---|
clickwrapEventId |
UUID | Unique identifier of the clickwrap event. |
clickwrapTemplateId |
UUID | Unique identifier of the clickwrap template. |
clickwrapTemplateVersion |
Integer | Major version of the template associated with this event. |
clickwrapTemplateVersionMinor |
Integer | Minor version of the template associated with this event. |
endUserId |
String | Your end-user identifier provided during verification. |
templatePlaceholders |
String (JSON) | JSON string of template placeholder values (as provided during verification). |
technicalMetadata |
String (JSON) | JSON string containing technical metadata (e.g., userAgent, ip). |
actionAt |
Timestamp | ISO-8601 timestamp when the end-user action occurred. |
effectiveAt |
Timestamp | ISO-8601 timestamp when the clickwrap version tied to the event became visible to end users. |
clickwrapEventStatus |
String | Finalized clickwrap event outcome (e.g., ACCEPTED). |
Callback delivery behavior
ClickTerm considers a callback delivery successful only when your endpoint returns 200 OK after validating the signature and processing the request.
Any response other than 200 OK — including all 4xx and 5xx responses — is treated as a failed callback delivery.
If delivery fails, ClickTerm automatically retries the callback according to the following policy:
| Setting | Description |
|---|---|
| Retry count | ClickTerm retries failed callback deliveries up to 3 times. |
| Retry backoff window | Delay between retry attempts starts at 60 seconds and increases with backoff up to a maximum of 300 seconds. |
| Request timeout | Each delivery attempt times out after 10 seconds. |
Webhook verification
import crypto from "node:crypto";
import express from "express";

const app = express();

// keep the *raw* request bytes for signature verification.
app.use(
  express.json({
    verify: (req, _res, buf) => {
      req.rawBody = buf;
    },
  }),
);

const CALLBACK_SIGNING_SECRET = process.env.CALLBACK_SIGNING_SECRET;
const TIMESTAMP_HEADER = "X-Clickterm-Timestamp";
const SIGNATURE_HEADER = "X-Clickterm-Signature";
const MAX_SKEW_SECONDS = 300;

app.post("/webhook", (req, res) => {
  const secret = CALLBACK_SIGNING_SECRET;

  const timestamp = req.header(TIMESTAMP_HEADER);
  const signature = req.header(SIGNATURE_HEADER);
  if (!timestamp || !signature) return res.sendStatus(400);

  const signingPayload = Buffer.concat([
    Buffer.from(`${timestamp}.`, "utf8"),
    req.rawBody ?? Buffer.from("", "utf8"),
  ]);

  const digest = crypto
    .createHmac("sha256", secret)
    .update(signingPayload)
    .digest("hex");

  const expected = `sha256=${digest}`;

  const ok =
    signature.length === expected.length &&
    crypto.timingSafeEqual(Buffer.from(signature), Buffer.from(expected));

  if (!ok) return res.sendStatus(401);

  // ... your logic here for processing the webhook payload...

  return res.sendStatus(200);
});

app.listen(3000, () => {
  console.log("Listening on http://localhost:3000");
});
import org.springframework.http.ResponseEntity;
import org.springframework.web.bind.annotation.*;

import javax.crypto.Mac;
import javax.crypto.spec.SecretKeySpec;
import java.nio.charset.StandardCharsets;

@RestController
@RequestMapping("/webhook")
public class WebhookController {

    private static final String CALLBACK_SIGNING_SECRET = System.getenv("CALLBACK_SIGNING_SECRET");
    private static final String TIMESTAMP_HEADER = "X-Clickterm-Timestamp";
    private static final String SIGNATURE_HEADER = "X-Clickterm-Signature";

    @PostMapping
    public ResponseEntity<Void> handleWebhook(
            @RequestHeader(value = TIMESTAMP_HEADER, required = false) String timestamp,
            @RequestHeader(value = SIGNATURE_HEADER, required = false) String signature,
            @RequestBody byte[] rawBody
    ) {
        if (timestamp == null || signature == null) {
            return ResponseEntity.badRequest().build();
        }

        try {
            // Build signing payload: "<timestamp>.<raw_body>"
            byte[] prefix = (timestamp + ".").getBytes(StandardCharsets.UTF_8);
            byte[] signingPayload = new byte[prefix.length + rawBody.length];

            System.arraycopy(prefix, 0, signingPayload, 0, prefix.length);
            System.arraycopy(rawBody, 0, signingPayload, prefix.length, rawBody.length);

            // Compute HMAC SHA-256
            Mac mac = Mac.getInstance("HmacSHA256");
            mac.init(new SecretKeySpec(CALLBACK_SIGNING_SECRET.getBytes(StandardCharsets.UTF_8), "HmacSHA256"));
            byte[] digest = mac.doFinal(signingPayload);

            String expected = "sha256=" + toHex(digest);

            // Constant-time comparison
            if (!constantTimeEquals(expected, signature)) {
                return ResponseEntity.status(401).build();
            }

            // ... your logic here for processing the webhook payload...

            return ResponseEntity.ok().build();

        } catch (Exception e) {
            return ResponseEntity.status(500).build();
        }
    }

    private static boolean constantTimeEquals(String a, String b) {
        if (a == null || b == null || a.length() != b.length()) return false;

        int result = 0;
        for (int i = 0; i < a.length(); i++) {
            result |= a.charAt(i) ^ b.charAt(i);
        }
        return result == 0;
    }

    private static String toHex(byte[] bytes) {
        StringBuilder sb = new StringBuilder(bytes.length * 2);
        for (byte b : bytes) {
            sb.append(String.format("%02x", b));
        }
        return sb.toString();
    }
}
Use the callback signing secret generated for your app to verify each webhook request.
Verification steps
- Read the raw HTTP body bytes exactly as received.
- Build the signing payload:
<timestamp>.<raw_body> - Compute
HMAC_SHA256(rawBody, callbackSigningSecret). - Compare with
X-Clickterm-Signatureusing constant-time comparison. - Reject any request with an invalid signature.
Receiver example
- Create a backend app.
- Capture the raw request bytes.
This is required because signature validation must use the exact bytes received. - Store your callback signing secret in an environment variable:
CALLBACK_SIGNING_SECRET=...
- Expose a public HTTPS endpoint (e.g.
/webhook) and configure it as your callback URL in ClickTerm UI. - On each request:
- read
X-Clickterm-TimestampandX-Clickterm-Signature - reject if missing
- (optional) enforce a small timestamp skew window to prevent replay
- compute
HMAC_SHA256("<timestamp>.<raw_body>", secret) - compare with the provided signature using a constant-time comparison
- read
- Return
200 OKonly after verification and successful processing.
Any other status code is treated as failed callback delivery.
Errors
Clickterm uses the following error codes that also correspond to HTTP status codes:
| Error Code | Meaning |
|---|---|
| 400 | Bad Request -- Your request is invalid. More details will be present with the response. |
| 401 | Unauthorized -- Your AppId, AppKey or token is incorrect. |
| 403 | Forbidden -- You are not allowed to access this resource. |
| 404 | Not Found -- The specified AppId is not valid or the template could not be found. |
| 405 | Method Not Allowed -- You tried to use a method not supported by our API. |
| 406 | Not Acceptable -- You requested a format that isn't JSON. |
| 409 | Conflict -- You are trying to create a resource that already exists. |
| 500 | Internal Server Error -- We had a problem with our service. Please contact our support team for assistance. |
| 503 | Service Unavailable -- We're temporarily offline for maintenance. Please try again later. |